


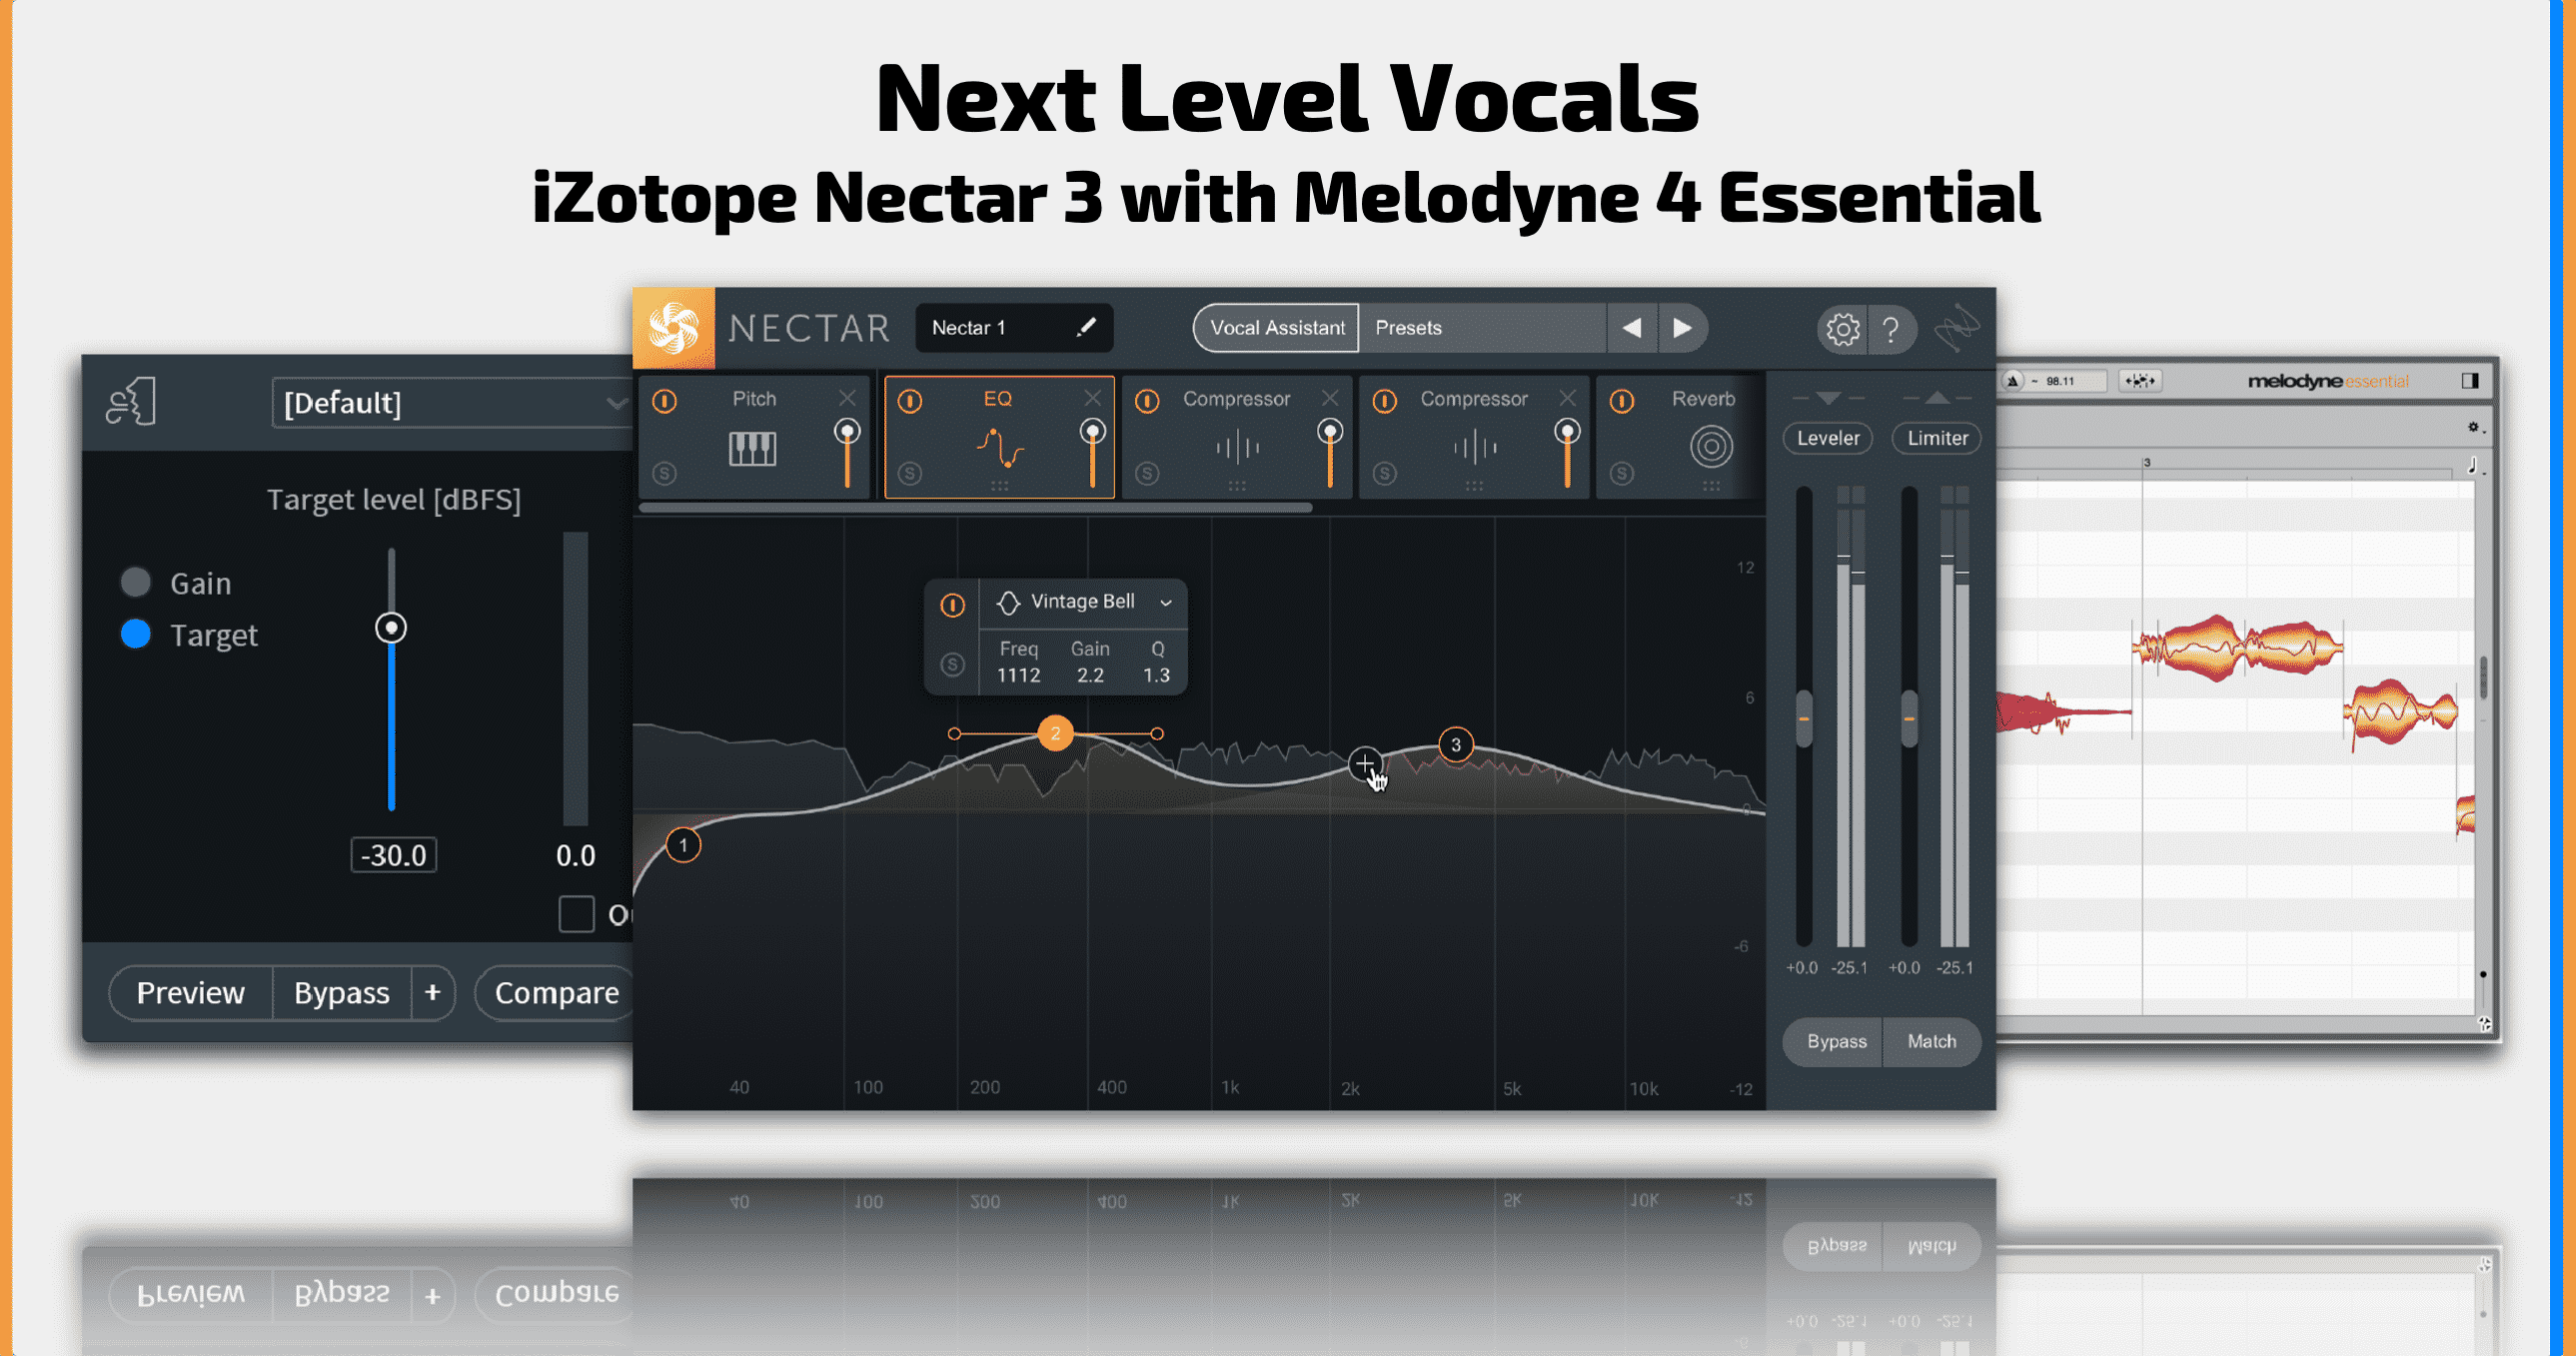
Next Level Vocals – iZotope Nectar 3 with Melodyne 4 Essential
iZotope has released their newest version of the vocal processing plugin Nectar 3. This is the next addition to their growing ecosystem of ‘smart’ plugins with assistive technology.
In this article, we’ll run through all of the effects modules in Nectar 3, and tell you what we think of them. Then, we’ll give a quick run through of Melodyne Essential 4 which comes bundled with each copy of Nectar 3.
[su_divider top=”no” divider_color=”#d2d2d2″ size=”1″]
iZotope Nectar 3
We tested out Nectar 3 using Ableton Live 10 and compared its effects to a combination of Soundtoys and Ableton Live’s native effects. We found it incredibly easy to replicate the sound between the two. This speaks to the ease and power that Nectar 3 brings to the table. Continue below to learn more.
What Is It?
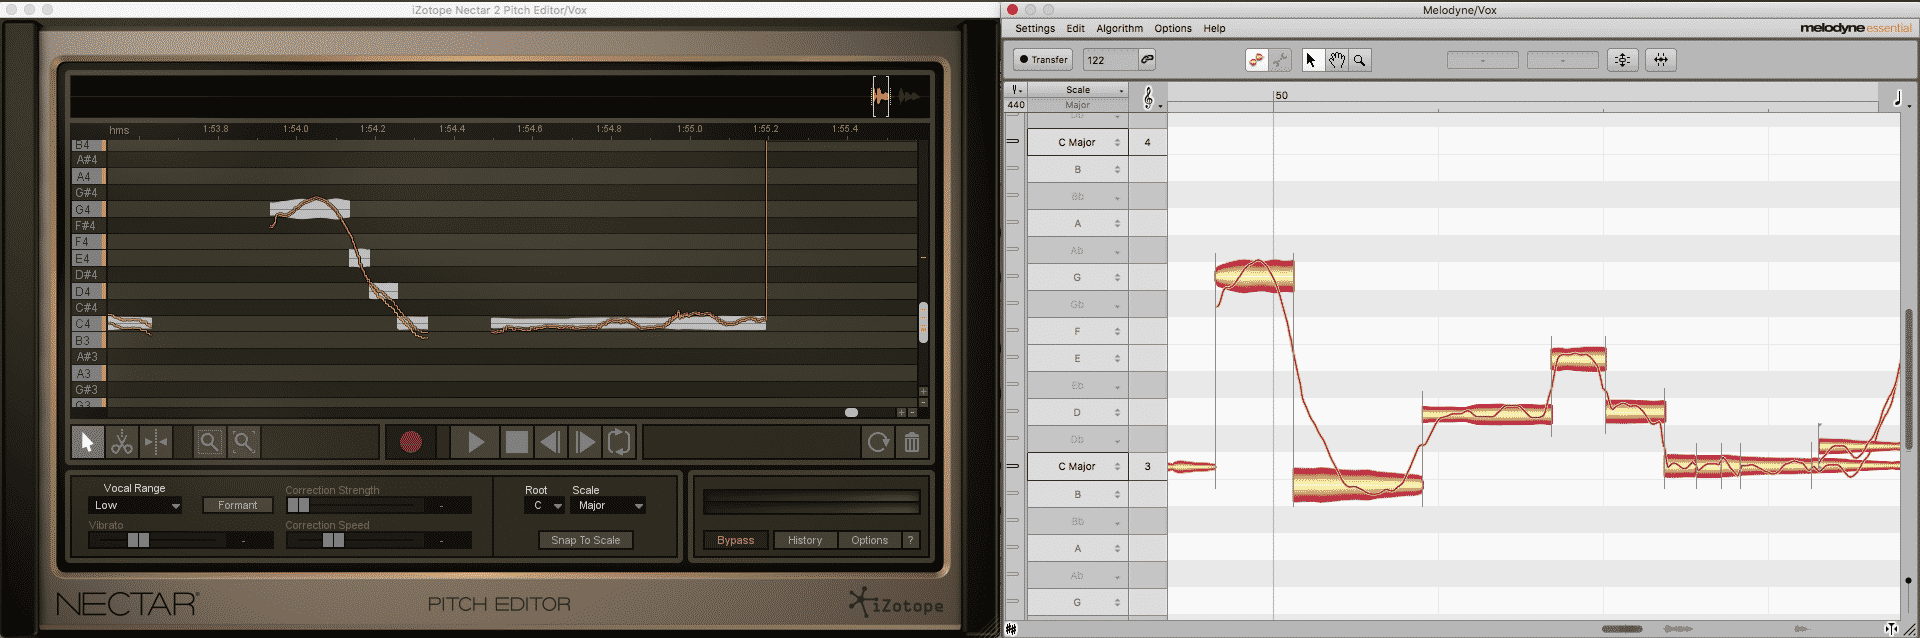
Nectar 3 is the newest version of the multi-effects plugin, following Nectar 2, and sports a shiny new look that we love. Below, Nectar 2 can be seen on the left while the updated Nectar 3 is on the right.

The interface matches that of its most recently updated plugins: Neutron, Ozone, and Vocal Synth 2 (if we missed any that rock the new look comment below). The look is cleaner, easier to navigate, and actually fun to use.
It’s a welcome update as we see new features that allow it to seamlessly integrate with other Izotope plugins like Neutron 2 and Ozone 8. Much like those two plugins Nectar 3 utilizes an assistive technology that can make automated adjustments to your effects’ parameters. This technology has proven itself beyond useful in Neutron and Ozone, and we believe it has done so again here.
Match Made in Heaven
In addition to the assistive technology and updated look, Nectar 3 comes bundled with Melodyne Essential 4 for pitch editing. Nectar 2 utilized its own pitch editor which was clunky and buggy. It felt transparent enough in the tuning but its drawbacks were too much to bother with it. Resizing the window caused our systems to lag nine out of ten times, and we were lucky if it worked correctly after that without restarting the session.
Not once did we experience that with Nectar 3 and Melodyne Essential 4, for that we tip our hats to Izotope and Celemony.
The Nectar 2 pitch editor did have an intuitive user interface, that we’ll say. Melodyne, however, is equally intuitive, we’ll dive into the workflow after reviewing the effects modules of Nectar 3 below.
[su_divider top=”no” divider_color=”#d2d2d2″ size=”1″]
Nectar 3 Modules
Nectar 3 operates as a multi-effects unit including ten modules that can be organized into any order you like. These modules include an (auto)Pitch, Compressor, EQ, DeEsser, Delay, Dimension, Gate, Saturation, harmony, and Reverb. Below we will go over the function of each module and tell what we do and do not like about it.
Pitch
Pitch correction is an essential tool in modern production. Lucky for us, Nectar 3 includes a highly functional auto Pitch module in their lineup of effects.
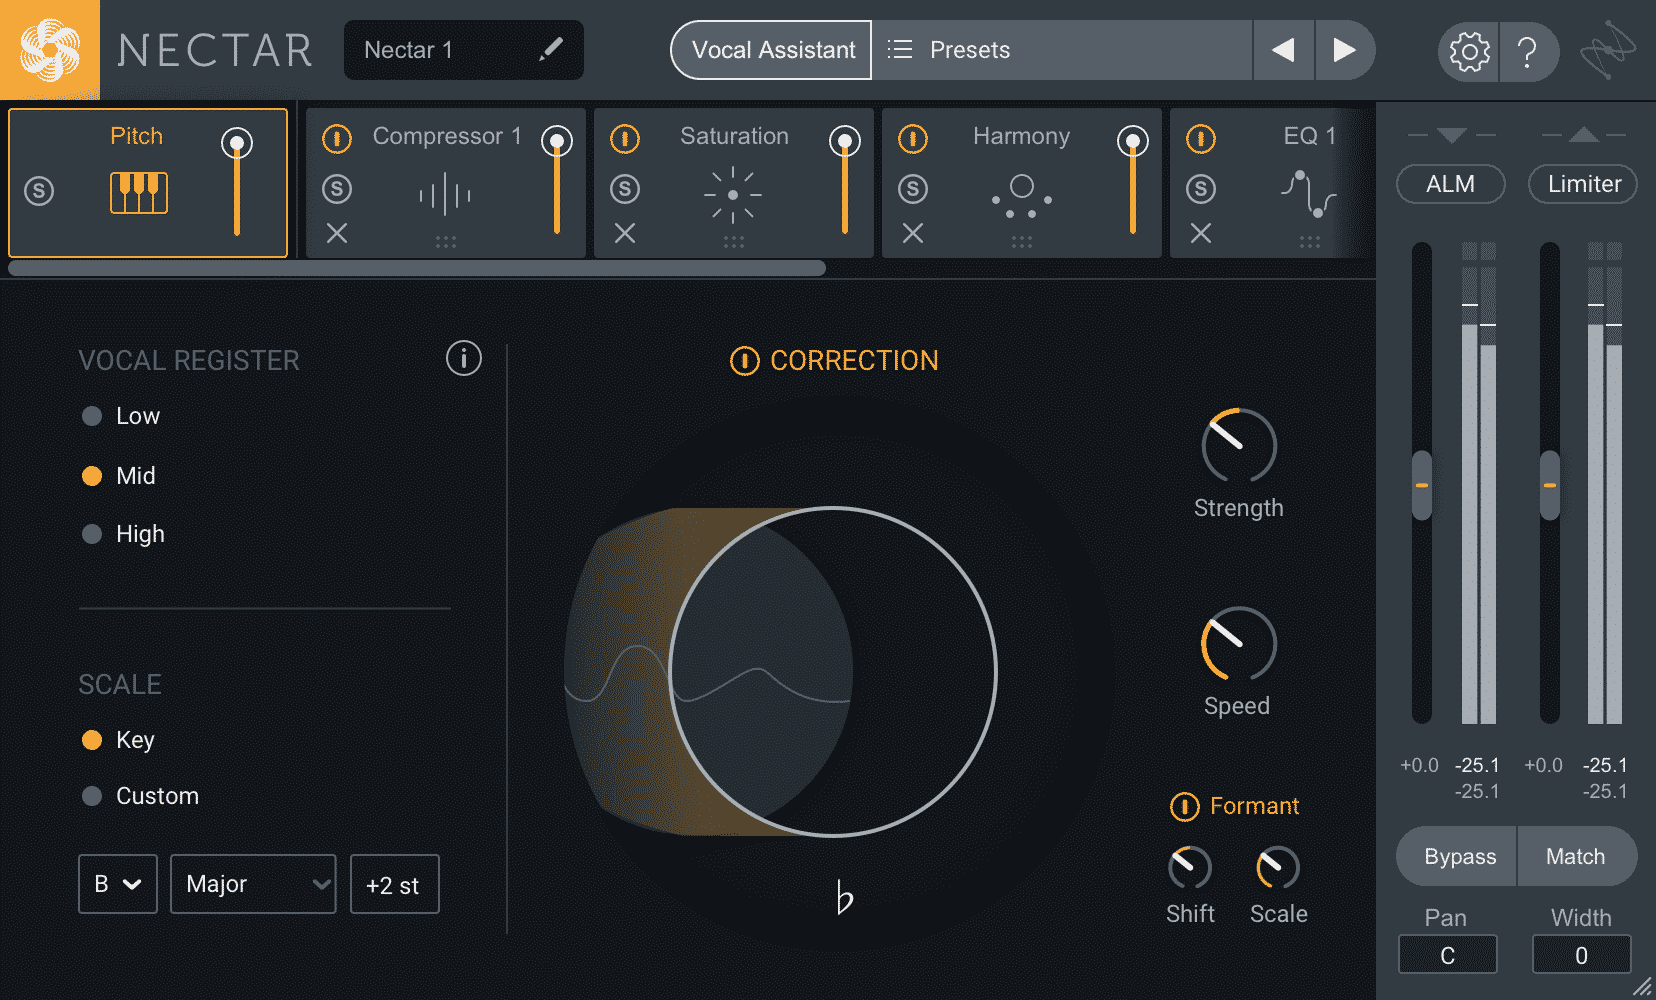
The interface sports a streamlined approach to auto Pitch. First, Nectar 3 has wonderful visual feedback for its effects modules. The circle in the middle indicates how accurate the vocal is. To the left, you can choose your vocal register. Look below that to set the key and scale of your pitch correction.
Set the key of the song by choosing from the drop-down menu. Choose a key, then shift the pitch of the incoming audio signal using the box on the right of the scales if you choose. You can also shift the pitch on the right side of the module under Formant. Above Formant, you will find the Strength and Speed dials, use them to adjust how quickly and how much to tune the vocals.
All in all, you get exactly and only what you need for an effective auto pitch effect. There isn’t any clutter which helps users focus. It sounds just as transparent as other autotune plugins, but coming with the effects chain puts in the running for the best vocal plugin available.
The inclusion of the Harmony module is something else you won’t get with most other auto pitch plugins, read below to learn more about it.
Harmony
Nectar 2 had an impressive Harmonizer and Nectar 3 has improved upon the technology. The same decluttering has been applied here as in the Pitch module, this makes it far easier to use than its predecessor.
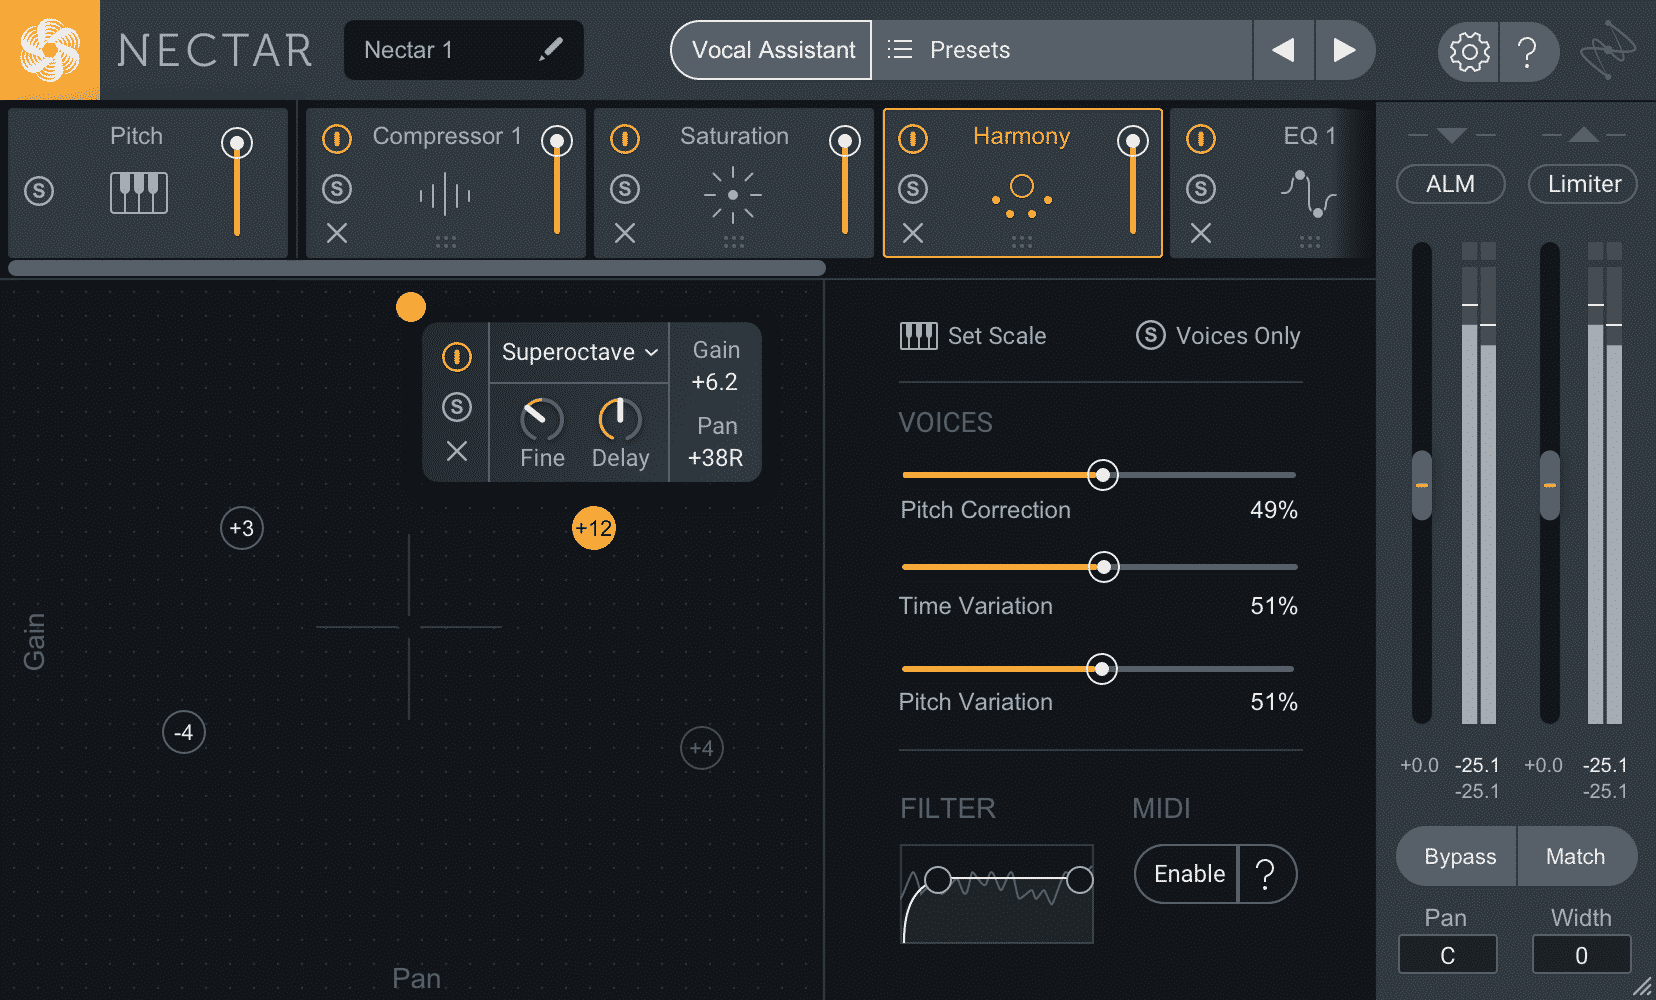
The module is split into two distinct sections. The left is an XY graph for adjusting the harmonies’ volume and stereo position. In the graph, you can add up to eight voices and select the semitone harmony for each voice. On each voice, you can finetune the pitch and delay (between 0 ms – 100 ms). The broad time and tuning settings are on the right.
You can also adjust how much the voices are pitch-corrected according to the chosen scale. If you tuned your vocals with Melodyne essentials we would suggest leaving this setting at 0%. You can also make specify the pitch and timing variation. So what do we think?
This is definitely an improvement upon Nectar 2. Can it replace a vocalist? No. But that may not be the intention, and at this point, no one will care if it doesn’t sound “real”.
As a creative effect, the Harmony module will spice up your vocals. It will also add some more width to your vocal group. The safest bet is to use the Harmony effect and tuck those layers in under further processing. But music production isn’t about playing it safe. Read below about the compressor.
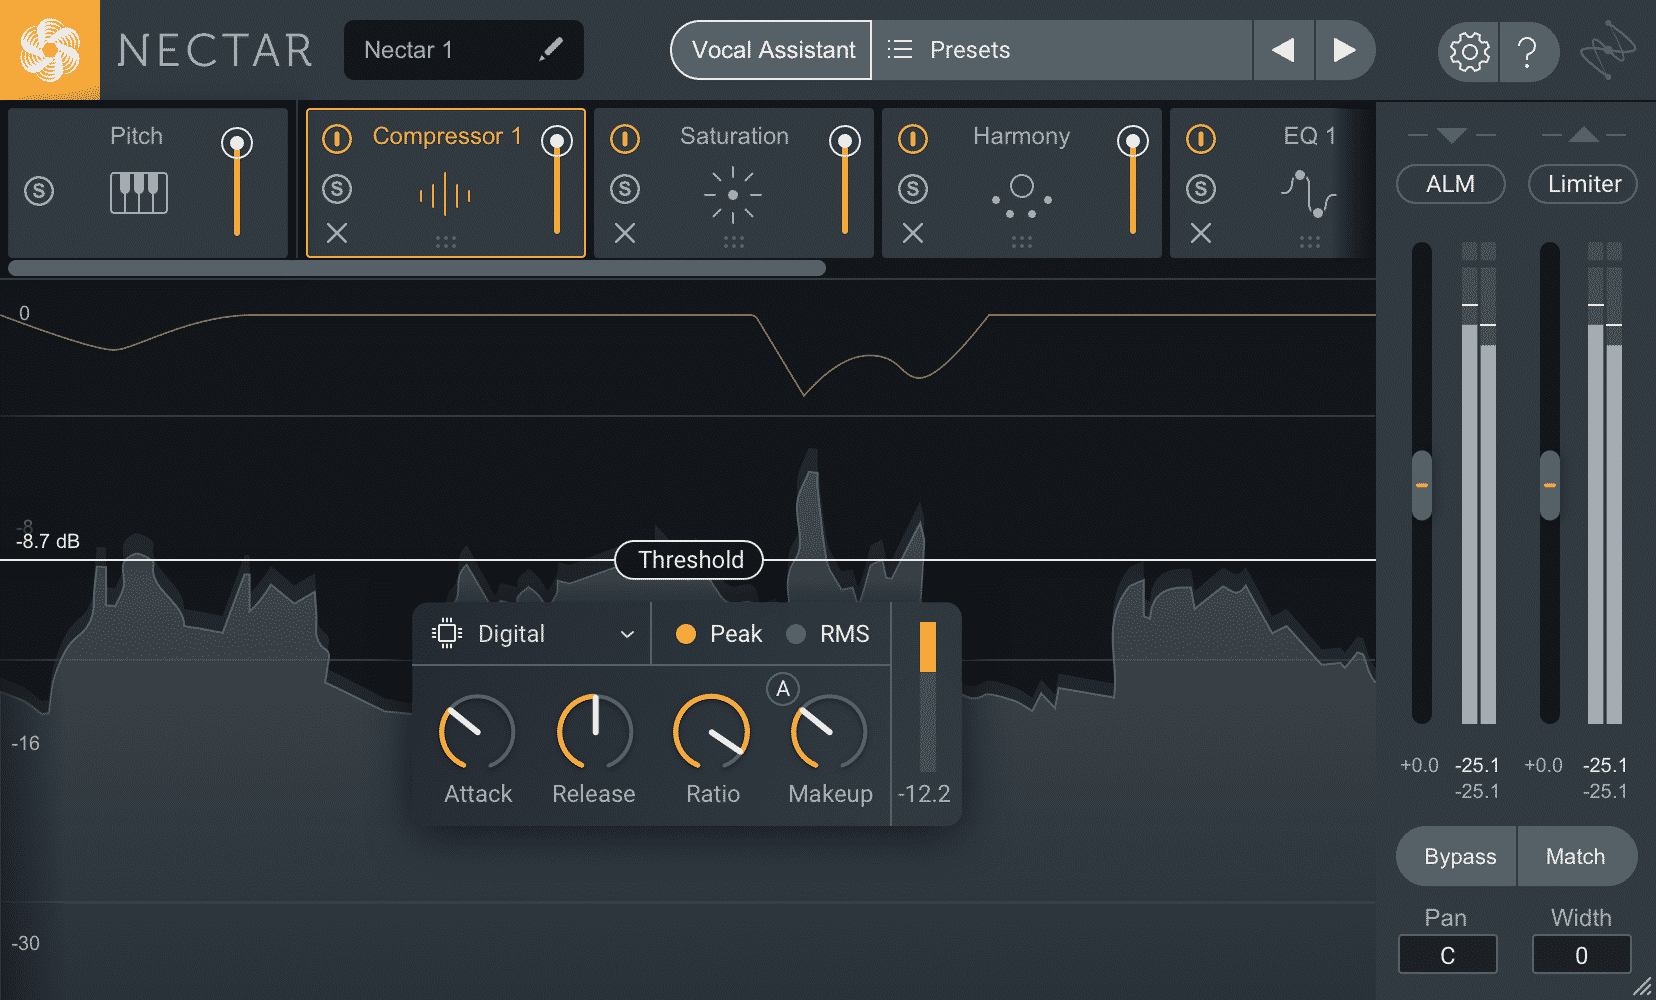
Compressor
The compressor continues the Nectar 3 trend of clean and concise. You will see a threshold bar and an orange gain reduction graph, plus a corresponding meter. The compression parameters are located on a dialog box where you can also select the various compression modes.
The four different compression modes are Digital, Vintage, Optical, and Solid-state. Below are their descriptions provided in the Nectar 3 manual:
Digital – Modern, surgical compression. Ideal for achieving precise, clean sounding linear compression with minimal coloration.
Vintage – Classic, analog compression. Emulates the program-dependent response and non-linear release characteristics of classic analog compressors.
Optical – Smooth and transparent compression with subtle coloration. Emulates the subtle harmonic coloration and non-linear attack and release characteristics of classic hardware optical compressors.
Solid-State – Clear but aggressive compression with unique harmonic coloration. Emulates the fast attack, non-linear release times and harmonic characteristics of early VCA transistor-based hardware compressors. Solid-state mode can be useful for accentuating vocal transients.
iZotope’s compressors are amazing. They can produce modern sound with the option for analog-styled coloration. The compressors here are just as versatile and powerful as in their Neutron and Ozone counterparts. The difference among compression styles becomes more apparent when pushed, so listen carefully.
EQ
The EQ is simply beautiful. You can add up to 24 bands in each of the two modules. That’s a total of 48 bands, and way more than you’ll ever need. It’s an incredible tool to have, and incredibly easy to work with.
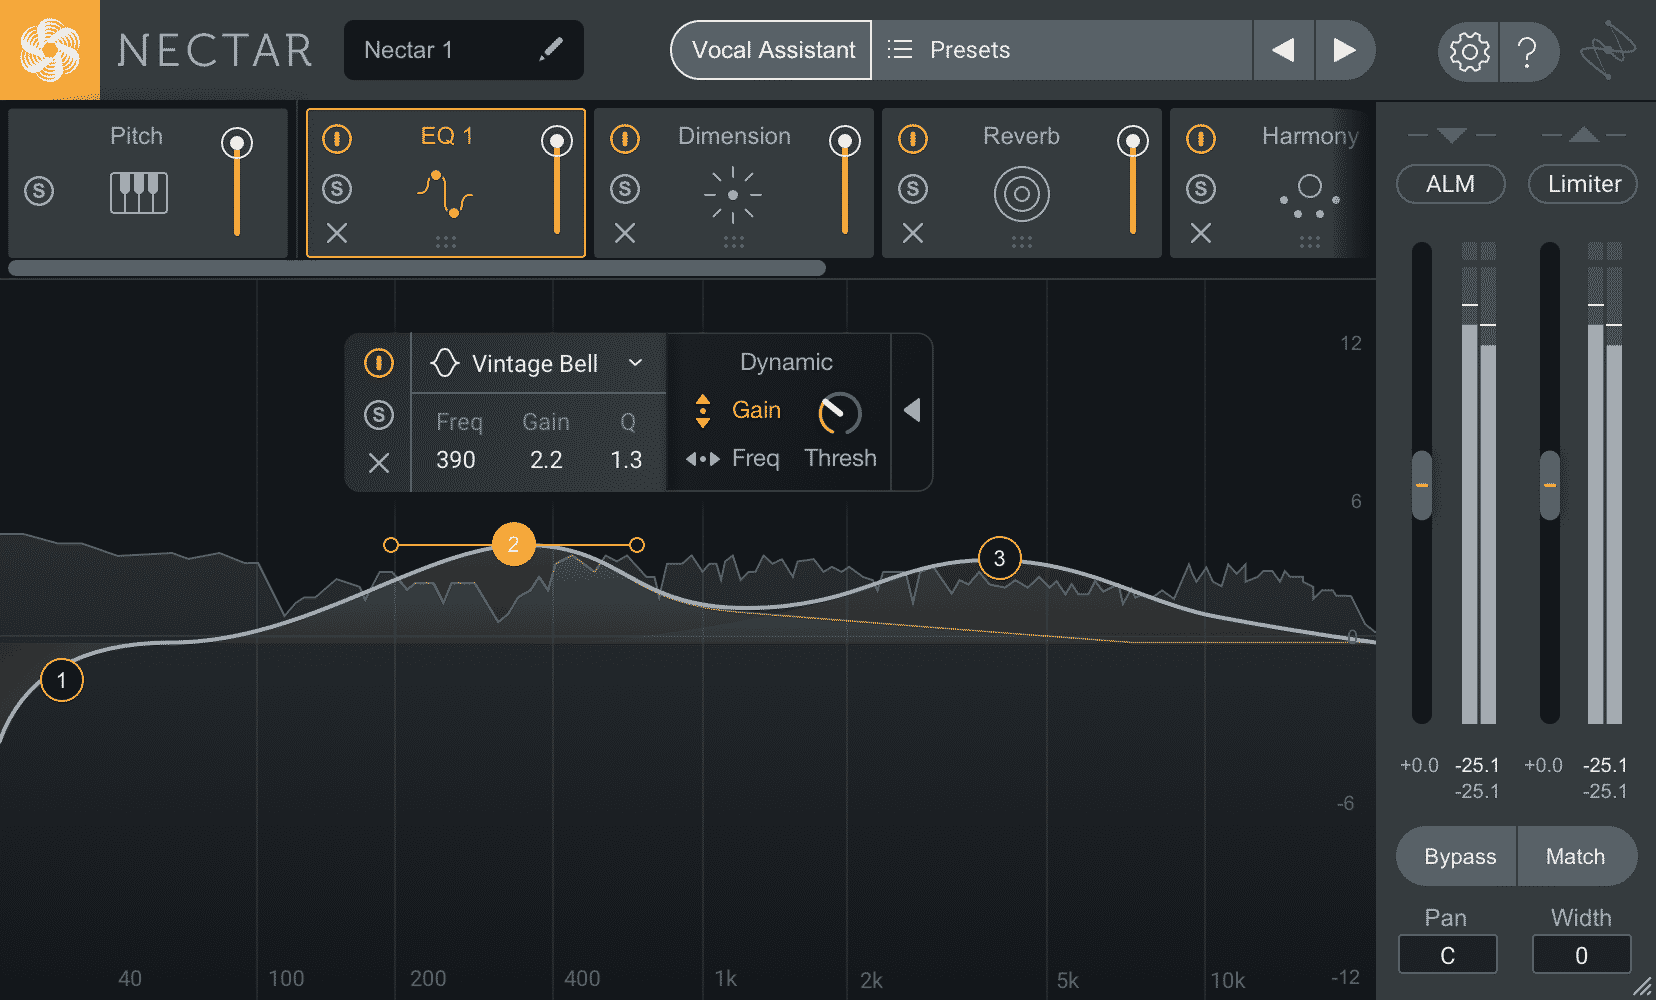
Choose curve shapes and make adjustments by clicking on each band number, easy. We really appreciate this UI design because it allows for an insane amount of control while remaining incredibly minimalistic. This layout forces you to look at the bigger picture yet gives you the tools to get surgical if you need to.
It’s an amazing EQ. Let’s move on to the DeEsser.
DeEsser
What is a DeEsser? A DeEsser is a compressor designed specifically for decreasing sibilance (the harsh sound heard when saying t’s and s’s).

The DeEsser is dead simple to use – drag the bar horizontally to adjust the frequency and vertically to adjust the threshold. Any time there is too much sibilance the DeEsser does its thing. To find the sweet spot click Listen and that will solo the sibilant frequencies.
The DeEsser works well and its metering abilities make it a breeze to set it effectively. This will address the details in your vocals which will up your production. You can also use the gate to tighten up your vocals, read about it below.
Gate
The Gate has the perfect amount of parameters (we’re sensing a pattern here, Izotope…) to cut out unwanted noise. Set the Open and Close thresholds to determine the volume that activates the effect.

A hot tip from the user manual – Move the close threshold down in order to pass more of the decay without affecting the trigger threshold. In some situations, undesirable signals that are near the level of the open threshold can cause the gate to “chatter” by crossing the threshold level too often.
You can use this gate to cut out noise in the recording and/or breathing noises. Once you’ve isolated just the singing voice you can spice it up with more effects, like Saturation.
Saturation
Saturation will add more harmonics to your vocals. It’s extremely simple to use because there are only three parameters – mode, amount, and EQ.

Below is the list of Saturation modes, courtesy of the user manual:
Analog – Mild, gritty distortion. Transistor type emulation with emphasis on odd harmonics.
Retro – Sharp, aggressive distortion. Based on a row of odd harmonics that are characteristic of transistors.
Tape – Classic, analog tape saturation. Emphasizes odd harmonics but with a shorter harmonic slope than that of a transistor-type saturation.
Tube – Rich, tonal excitation. Emulates tube saturation with a mix of odd and even harmonics.
Warm – Subtle, harmonic warmth. Generates even harmonics with a steep slope.
Decimate – Unique, digital decimation. Reduces sample rate to introduce distortion artifacts introduced by aliasing.
Distort – Aggressive, dirty saturation.
Which each of these different modes, the amount knob will control just how gritty it will sound. Warm, crunch or mangle with it and make your vocals stand out. The last three effects you can use are all great for adding space and depth to your vocals. Read below to learn about their features.
Delay
The Nectar 3 Delay module comes equipped with stereo controls, modulation, saturation, and a two-band post-EQ that takes up most the GUI. The two EQ bands control low and high pass filters.
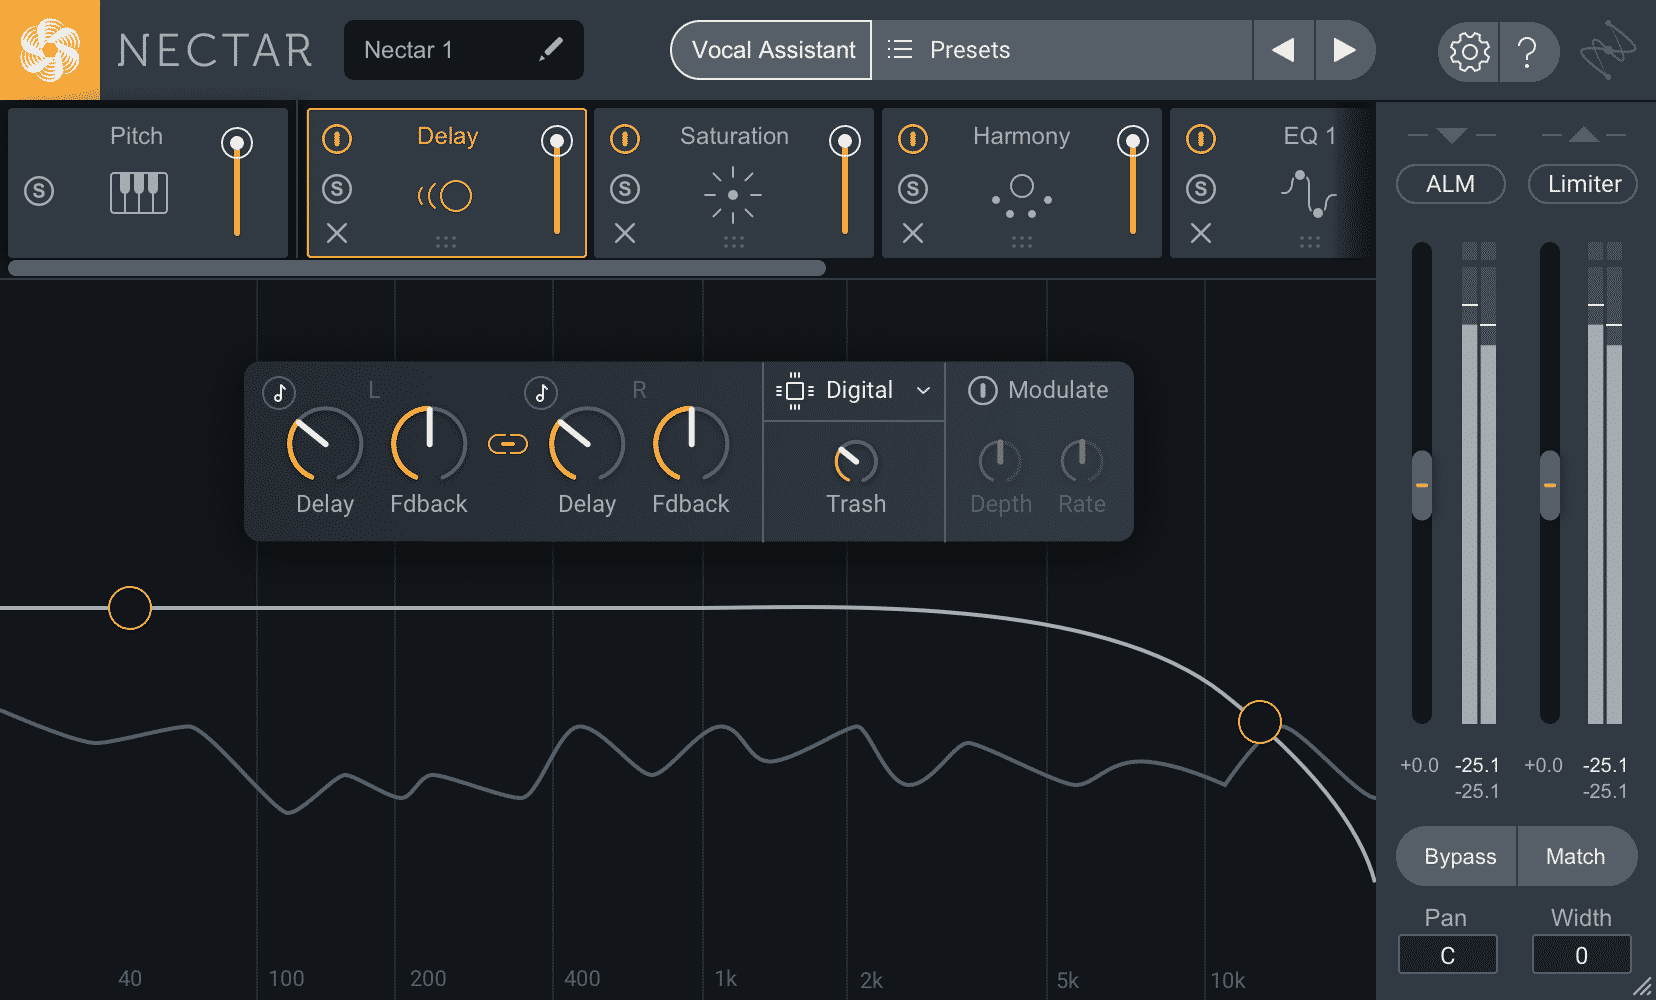
The stereo controls allow for individual delay timing and feedback for the left and right channels. You can link the control by clicking the button in between the dials, and switch between milliseconds and beats by clicking the musical-note button. There is a drop-down menu with five saturation modes, below are their classifications and descriptions from the user manual:
Digital – Transparent, clean delay. Provides exact copies of the incoming signal with minimal coloration.
Tape – Classic, colorful drive. Filters and distorts each progressive repeat in the way a signal would be degraded over time on magnetic tape.
Analog – Gritty, distorted edge. Based on circuit distortion, can lend a gritty edge to the delayed signal.
Grunge – Dirty, degraded character. Adds post-feedback crunchy drive to the delayed signal.
Echo – Pronounced presence boost.Repeats and fades out tape saturated copies for adding creative depth and impactful presence.
With each saturation option, you gain a completely unique tonal character in your delay. Izotope cleverly named the next effect we cover Dimension. Read below to learn about it.
Dimension
Dimension is a catch-all term for the three time-based effects in this module – Chorus, Flanger, and Phaser. Each effect has five parameters for shaping the tone – Rate, Feedback, Depth, Width, and Frequency.
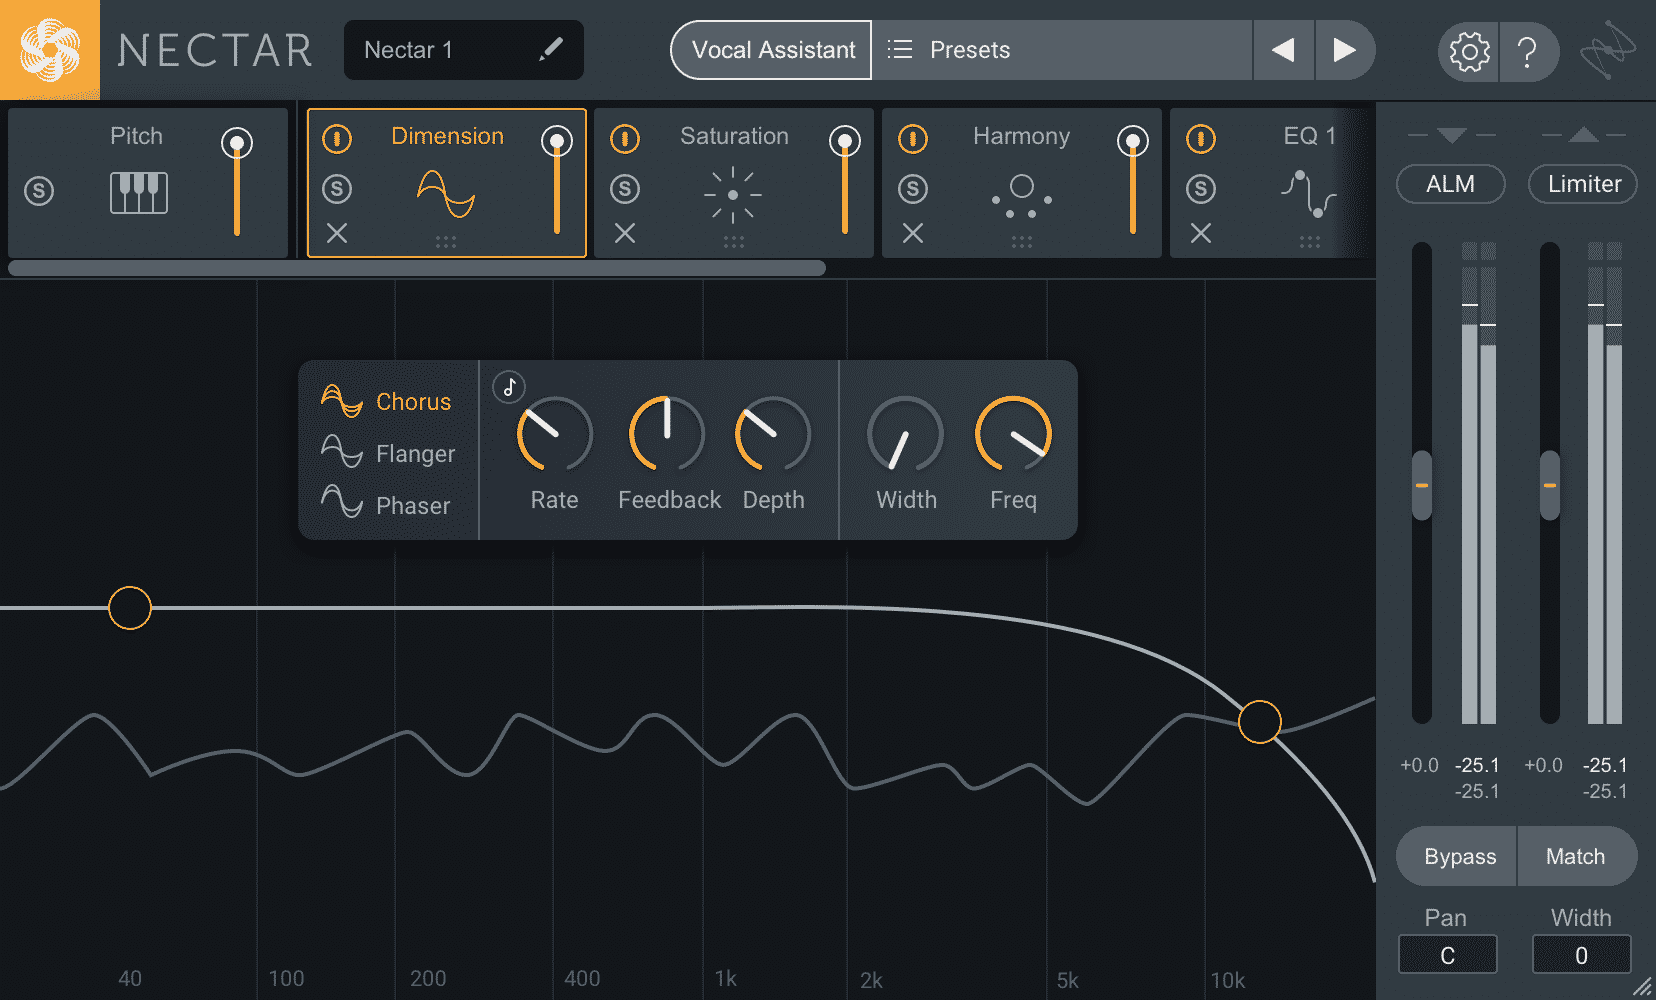
Select one of the effects and adjust the dials to your liking. Each of the effects will give a dope effect and add dimension to your sound (well-played, Izotope).
Anyone working with stock plugins will find these a welcome addition to Nectar 3. Read below for the final module we will cover, Reverb.
Reverb
Reverb, the holy grail of effects. It can instantly bring an instrument to life and is essential on vocals. According to Izotope, Nectar 3’s reverb is “modeled after the classic EMT 140ST Stereo Plate Reverb”. It produces a crisp tone that can be adjusted using the 4 parameter knobs – Pre-delay, Decay, Width, and Saturation.
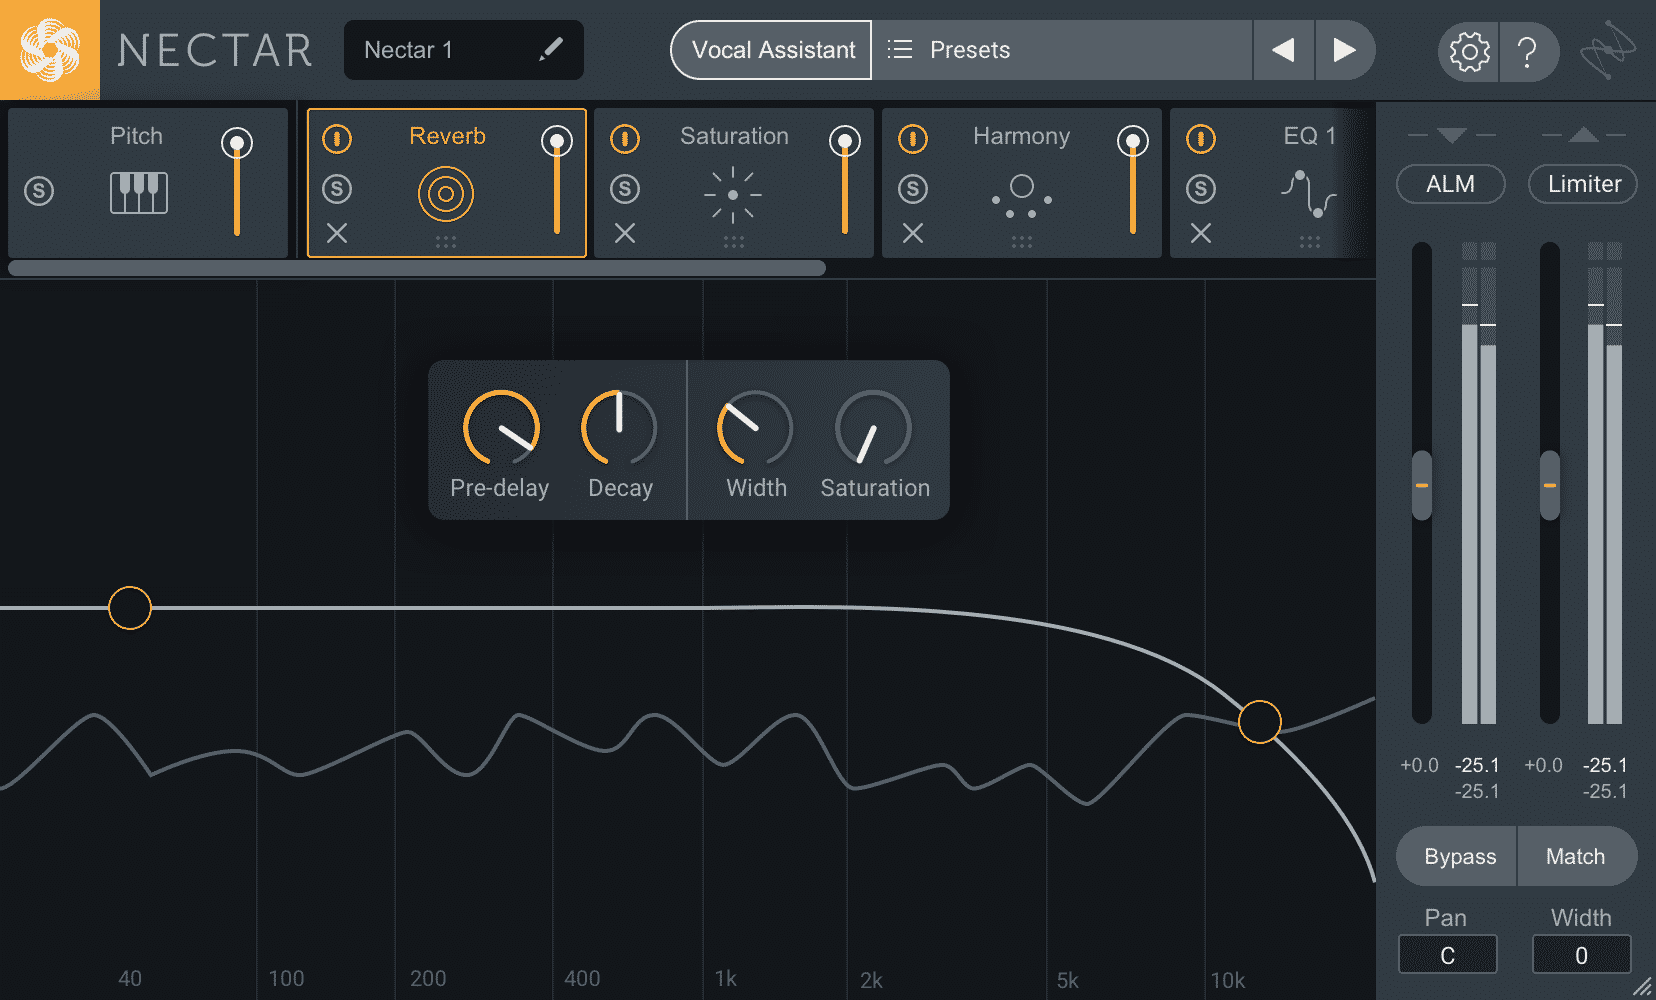
There is a 3-band post-EQ included where you can adjust a high-pass, a low-pass, and a single bell filter. This effect perfectly sums up the general abilities of Nectar 3’s modules – crisp, straightforward, and concise.
Read below for a quick overview of the workflow between Melodyne Essential 4 and Nectar 3.
[su_divider top=”no” divider_color=”#d2d2d2″ size=”1″]
Melodyne Essential 4
Need a slight bit of autotuning? Nectar 3 has you covered. Do you want to get more hands-on and edit your vocal takes with precision? Melodyne Essential 4 is there for you, and fortunately, it is included with Nectar 3.
Whoever made the decision of bundling the two deserves a raise over at iZotope. Melodyne is a serious improvement over Nectar 2’s pitch editor, which was a nice feature to have but always too buggy. Letting that slide away and offering the role to the masters at Celemony was a stroke of genius.

Insert Melodyne Essential to the first space on your effects chain. Make sure the selected algorithm is Melodic, then use the Transfer button in the upper left to record the audio. Finally, adjust the individual words to your liking.
The Melodyne workflow is a perfect companion to Nectar 3. Though if you’re using Melodyne you should deactivate the Pitch module in Nectar 3. You get pitch editing and time adjustment in a simple to use package.
[su_divider top=”no” divider_color=”#d2d2d2″ size=”1″]
Conclusion
iZotope’s Nectar 3 is a powerhouse of a plugin. If you’re looking for a one-stop shop for modern vocal processing look no further. You get ten effects modules (and can add up to twelve total), one of which is a crisp autotune, and the coveted Assistant technology found in other Izotope plugins.
From any other company, Nectar 3 would only be a great vocal multi-effects rack. What makes this plugin different from everything else on the market is the Vocal Assistant feature and its control over the already powerful effects in the plugin. One click and the plugin will assess your vocal track and create an effects-chain it deems appropriate.
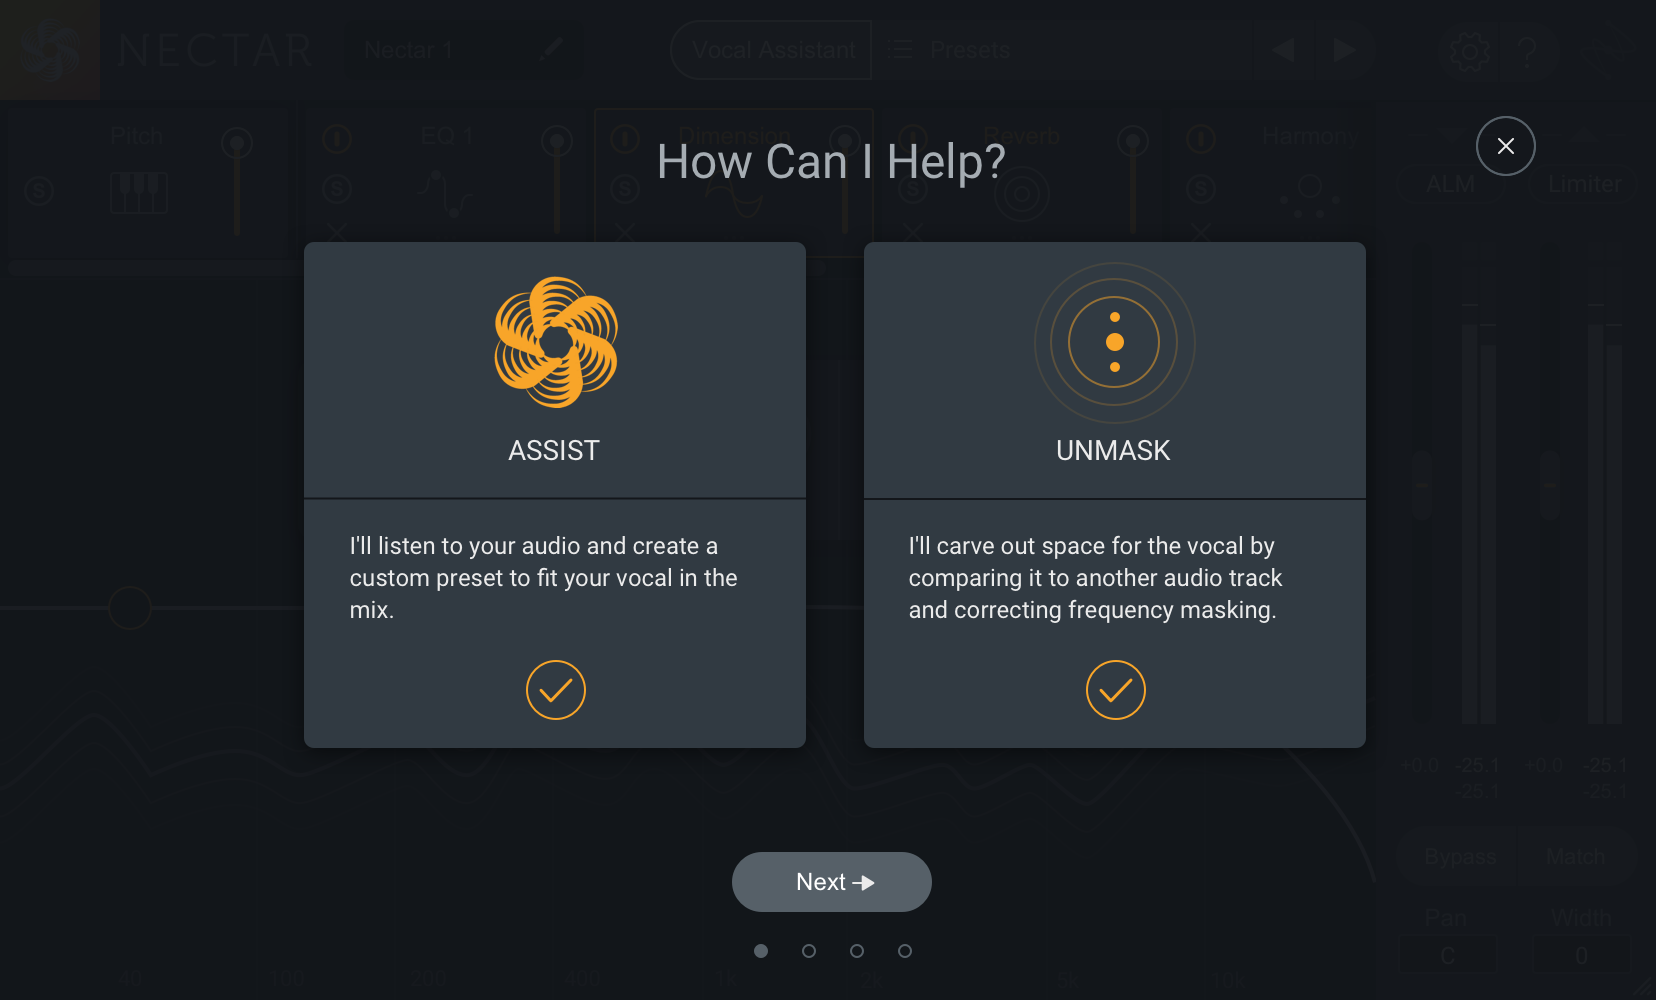
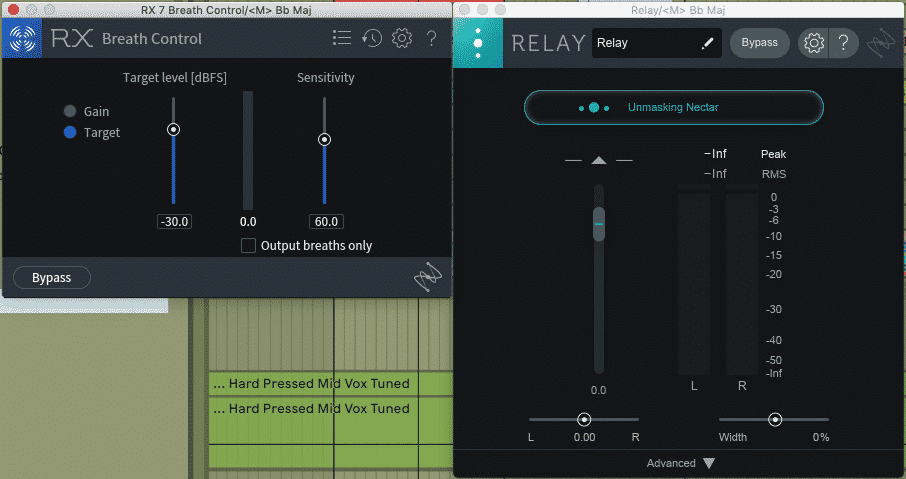
You have the ability to create a custom preset or connect the plugin to another track via the companion plugins Relay. Utilizing Relay you can ‘carve out space’ for your vocals with a single click. This sort of ease is worth the price of admission. That plus the inclusion of RX7 Breath Control, and Melodyne Essential 4 for pitch editing makes Nectar 3 one of the best options on the market.
You can get your copy of Nectar 3 from iZotope on sale for $199 now (reg. $249). If you own any Izotope plugin you can use your loyalty discount to purchase the plugin as well.
[su_divider top=”no” divider_color=”#d2d2d2″ size=”1″]
Are you a music producer? Do you want to improve your skills and become part of a growing community of super producers? Check out our classes, new semester starting January!
[su_divider top=”no” divider_color=”#d2d2d2″ size=”1″]
Featured Masterclass


0 responses on "Next Level Vocals - iZotope Nectar 3 with Melodyne 4 Essential"