

This class was developed for Moorpark College and Calarts during the COVID-19 pandemic to allow students to create Live Performances using only their computer keyboard.
Special thanks go to Nathan Bowen(Moorpark College), Jordan Hochenbaum(Calarts), and Javad Butha(Ableton) for making this happen.
[divider style=”clear”]
Ableton Keyboard Layout
Your computer Keyboard can be used as a MIDI controller in Ableton. First, turn on the Computer MIDI Keyboard.
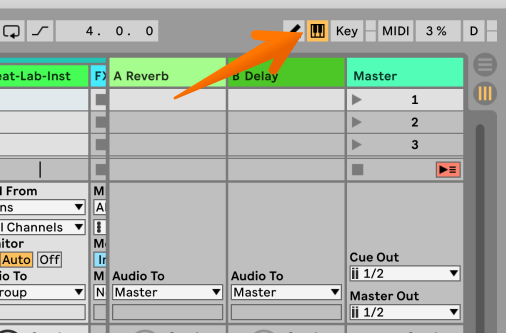
- Up to Live 9, it’s on by default. If it’s not, you can turn it on with a click.
- From Live 10, it’s now off by default. To turn it on, either click on the icon or press the M key.
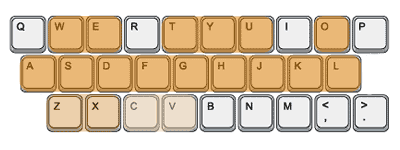
The A, S, D, F…. row will play the white keys. A is C, S is D, D is E, F is F, and so on.
The W, E, R, T…. row will play the black keys. W is C#, E is D#, T is F# (R and I are not used for notes to keep the same layout as a piano where we don’t have black keys between the notes E and F, B and C.
Pressing Z lowers the octave range while X raises it.
C and V let you adjust the incoming note velocity by intervals of twenty.
[divider style=”clear”]
Key Mapping
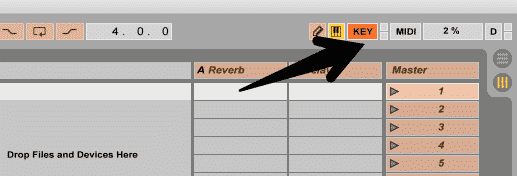
To enter Keyboard mapping mode simply click on KEY button on the top right corner of the screen or hit CMD+K or CNTRL+K.
Now you can map anything that is highlighted in color (orange by default) to be controlled by your computer keyboard.
You can map any letter or number and you can even use capital letters for more mapping options.
Please note that if you map using a letter (numbers are not affected) that letter will no longer trigger notes.
Before we start mapping we first need to decide which instrument and effects we need. Things like Drums, Keys, Leads, Bass and any processing effects like compressors, EQs, reverbs and delays.
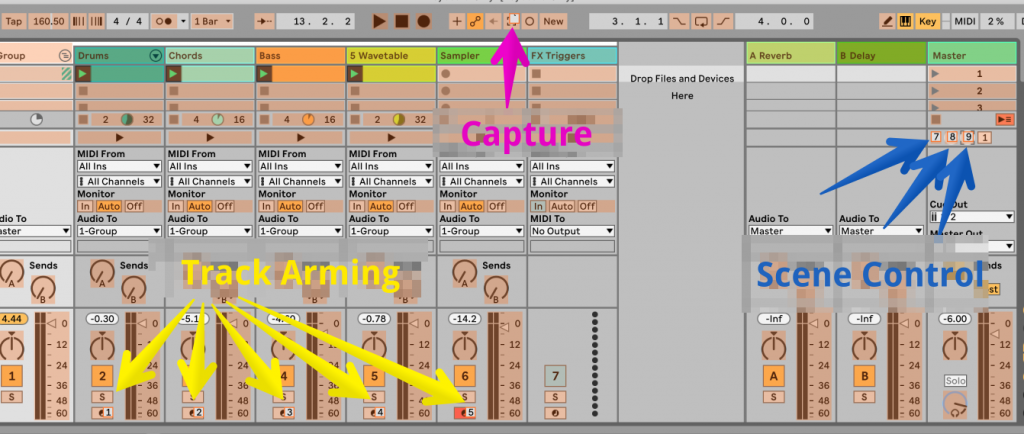
After we have all our instruments loaded we will need to map a few things:
- Capture (See next section)
- Track Arm Buttons *the computer keyboard top row of numbers is a good place to start here
- Solo and Mute Buttons (Optional)
- Scene Control – Up/Down and Launch (Optional)
[divider style=”clear”]
[divider style=”clear”]
Live Looping with Capture

Thanks to Capture, Ableton is always listening to incoming MIDI. This feature allows us to create easy live looping performances.
First, let’s map the Capture button to a key on our keyboard. I chose the ` next to number 1.
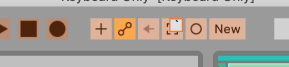
Note: The button is greyed out when there’s no MIDI data to capture. It changes to black once there’s MIDI data captured and ready to be inserted.
We can start our live looping with an empty project. Make sure the track your playing is Armed or Monitor is set to In.
If playback is not running and there are no existing clips in the set, Capture MIDI analyzes the average tempo of the captured MIDI and adjusts Live’s tempo once the Capture MIDI button is pressed. Playback then starts automatically. If playback is already running, or if clips already exist in the set, the tempo does not get adjusted.
Now we can start our live looping session. Remember that Capture even lets you overdub! So for example, you can start with just hats, hit capture, and then play your kick and snare on the same instrument. Even though there is already a capture clip that is playing the next time you hit capture Ableton will add (overdub) your kick and snare into the clip.
[divider style=”clear”]
Instant Sampling
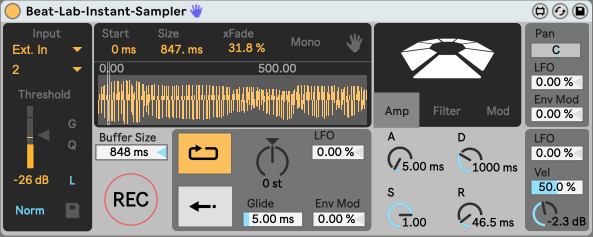
Beat Lab Instant Sampler lets us record a small sound and immediately be able to play on the keyboard.
Check out full details and download HERE.
[divider style=”clear”]
Momentary FX
In most cases, when we map KEY mapping to an effect it will work as a toggle. First press on, Second press off.
This might not be the idle way of controlling effects with our computer keyboard. Instead, it will be more fun and efficient to use Momentary FX. when we press the key the effect turns on when we release the key the effect turns off.
To easily set this up we can use the free Momentary 8 from Yehezkel Raz (Download at the bottom of the page)

We can place this device on an Empty MIDI Track and set the Monitor to IN so it’s always listening.
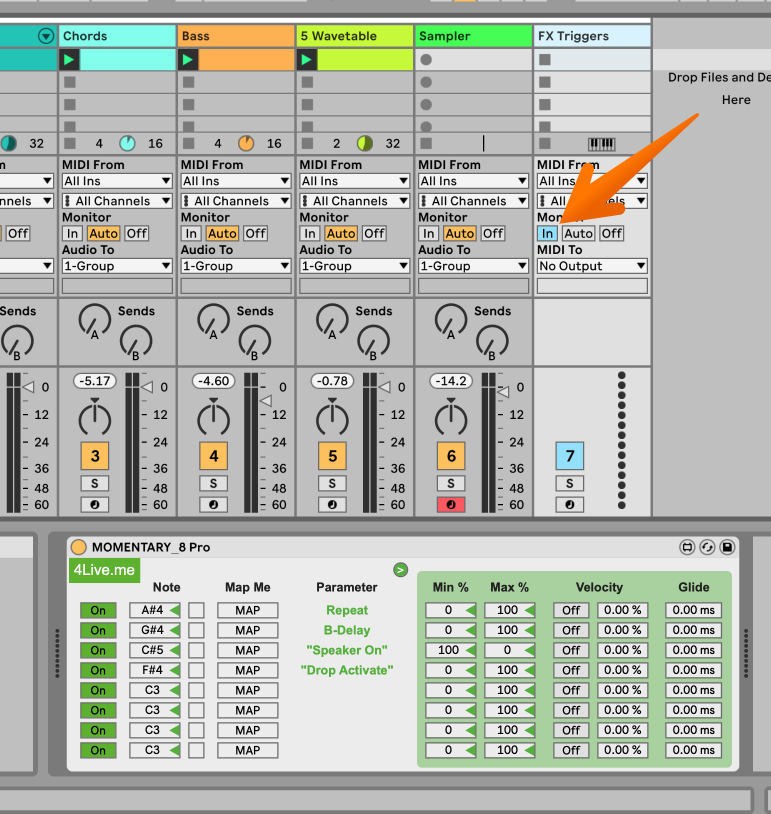
Next, we can choose notes on our keyboard that we are not using in the performance (Maybe notes out of the key of your tune) and set them up as the receiving notes in Momentary 8. Then, click the map button and then click the mapping destination (it can be on other tracks). For example, we mapped a Beat Repeat on/off, Send Knob B for Delay, Global Mute, and Pitch Drop Effect on/off.
You can use the Min/Max column to reverse the behavior of the key if necessary.
[divider style=”clear”]
Controlling FX with Your Voice
Thanks to Max for Live it is now possible to control FX with your voice.
Create a new Audio Track. Set the Audio From to receive from your built-in Mic. and Mute the track (unless you also want to use your voice to sing) and set Monitor to In.

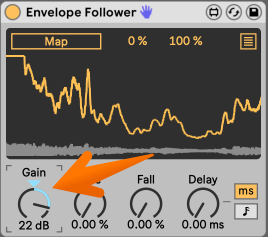
Then load Envelope Follower (Included in Ableton 10 Suite) onto the Track.
Turn up the gain until you the graph moves all the way up when you speak or make a sound into the mic.
Now we can click the map button and while it’s blinking go to any other track and click on any parameter we want to affect. For example, the Global volume of filter frequency.
Play with the Rise and Fall values in the Envelope Follower to change the timing of modulation.
You can click on the list button to reveal more mapping buttons to map up to 8 other destinations.
Each mapping has it’s own MIN/MAX settings.

[divider style=”clear”]
Downloads
Instant Sampler – Turn any sound to an instrument instantly
Momentary 8– Allows for Momentary FX triggers. (Developed by Yehezkel Raz)
Real-Time MIDI Quantization – Allows for real-time MIDI quantization while the Live Set is playing.
Reverser – Real-Time Audio Reverser/Repeater
[divider style=”clear”]

[divider style=”clear”]
Workshop Video
[su_vimeo url=”https://vimeo.com/411504769″ width=”780″]
[divider style=”clear”]
[divider style=”clear”]
[su_button url=”https://beatlabacademy.com/online-certification-program/” style=”ghost” background=”#303133″ color=”#303133″ size=”12″ wide=”yes” center=”yes” radius=”20″ icon_color=”#303133″ class=”custombuttonsyeuda”]Beat Lab Online[/su_button]
[su_button url=”https://beatlabacademy.com/request-more-info/” style=”ghost” background=”#303133″ color=”#303133″ size=”12″ wide=”yes” center=”yes” radius=”20″ icon_color=”#303133″ class=”custombuttonsyeuda”]Contact Us[/su_button]
[su_button url=”https://beatlabacademy.com/class-visits/” style=”ghost” background=”#303133″ color=”#303133″ size=”12″ wide=”yes” center=”yes” radius=”20″ icon_color=”#303133″ class=”custombuttonsyeuda”]Class Vists[/su_button]
Featured Masterclass


0 responses on "Beat Lab Guide - Performing with Your Computer Keyboard"