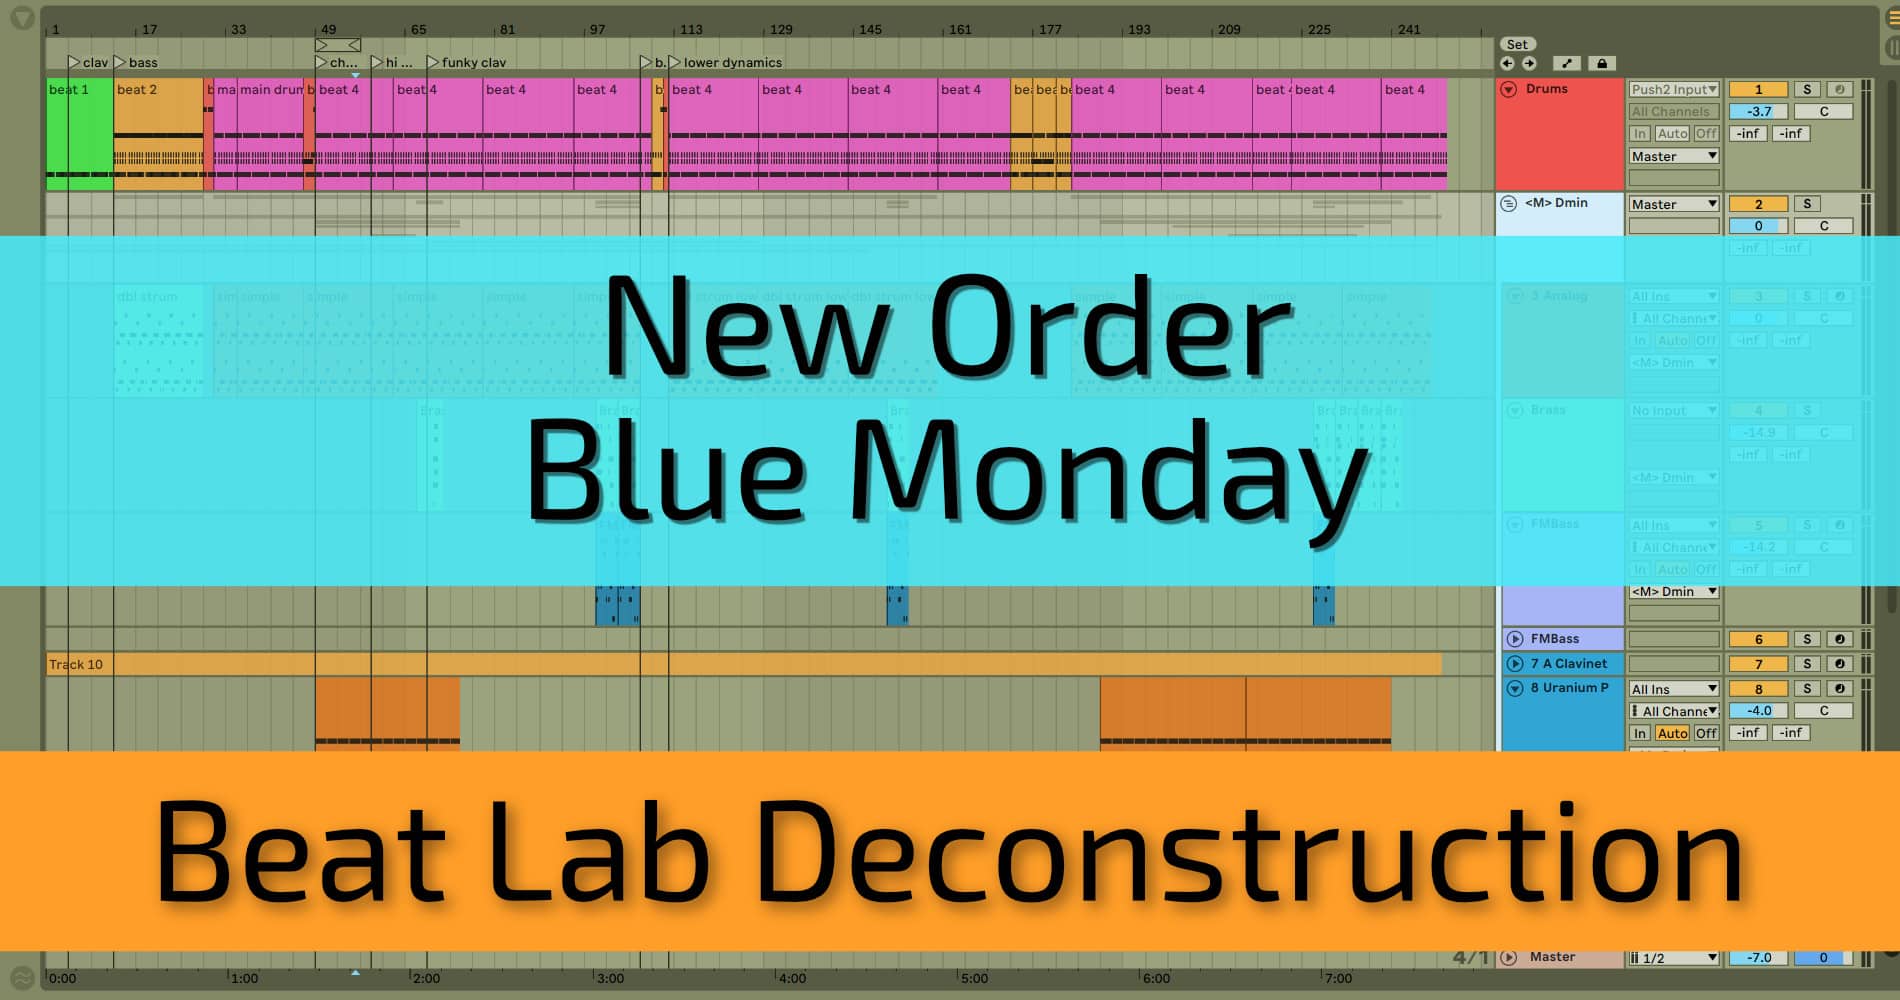
This week we’ll be starting our step-by-step guides for breaking down famous songs from history. We’re extremely excited to start with this instant hit – Blue Monday by New Order.
Blue Monday is the best-selling 12″ single of all time so we figured it would be a good song to start this series with.
For this and likely all future constructions we will be using Ableton Live 10 Suite. If you do not have Ableton Live or the same version, do your best to follow along.
Drums
Blue Monday’s drums are really quite simple, they follow four main drum patterns with the same break inserted multiple times throughout the song. Fortunately for us, they were also sequenced on a drum machine which makes recreating them a breeze. Find your DAW’s version of the Oberheim DMX and place it on your drum track, then get started on the patterns below.
The first pattern is a variation of a four-on-the-floor rhythm. They added 1/16th notes in between the third, fourth and fifth 1/8th note downbeats. See the image below.

That pattern runs for 16 bars before adding claps, snares, and closed hi-hats. Using the same kick pattern, make a new clip and add clap plus snares on every other kick downbeat. Then add hats on the downbeats and 16th notes in between. Look at the image below to follow.

This intro drum beat runs for another 16 bars before the infamous drum break pictured below. To recreate it add only kicks and snares to a new 2 bar clip. Add hits on 1.0.0, then 1.1.4, then on the second upbeat at 1.2.3, then another on 1.3.2. Duplicate this to the second bar and you’ve got yourself a swaggy drum break.

Finally, create the main drum pattern. It is a simple four-on-the-floor with closed hats on the offbeat, and claps/snares on the upbeat. You can add some reverb to the clap mostly, and a bit on the snare to emulate the original song. See the image below.

Bass
Before we talk about the bass lines we want to help you design the sound. Our instructions are assuming you have Ableton Live’s Analog synth so if you do not then follow along with your own synth and match the parameter settings.
Open up a synth and two oscillators. Make sure both amps and filters are active then activate LFO 1.
Both oscillators should have flat pitch envelopes, the Time percentage doesn’t matter. What matters is that you focus on the wave shapes and the filter settings. This is where the sound will take shape.

Osc 1 should be a square wave, and Osc 2 should be a saw wave. Drop Osc 1 down an octave and Osc 2 down two octaves. Then move onto the filters. Adjust the frequency cutoff on Filter 1 to around 140 hertz, and the resonance around 30 percent. Adjust Filter 2 to around 220 hertz and 20% resonance.
Make sure to adjust your amplitude envelopes to a very quick Attack and Decay. This will create the plucky sound that makes the bass so groovalicious.
Now that you’ve made your bass patch, save it to your presets for use in future productions! Move on below to learn the bass progressions.
The bass line that runs throughout the song is another straightforward progression. The intro bass line jumps between lower and higher octaves on F-C-D-G-C-D. This bass line continues later in the song and simply changes the double strum to a single strum.
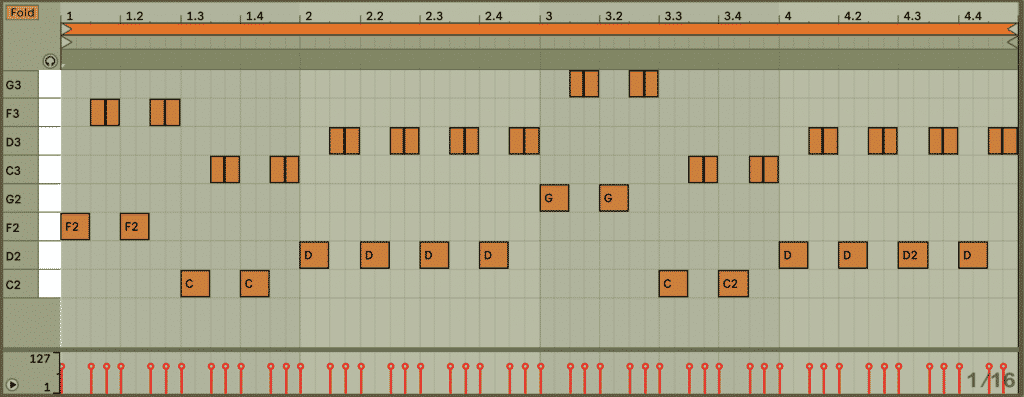
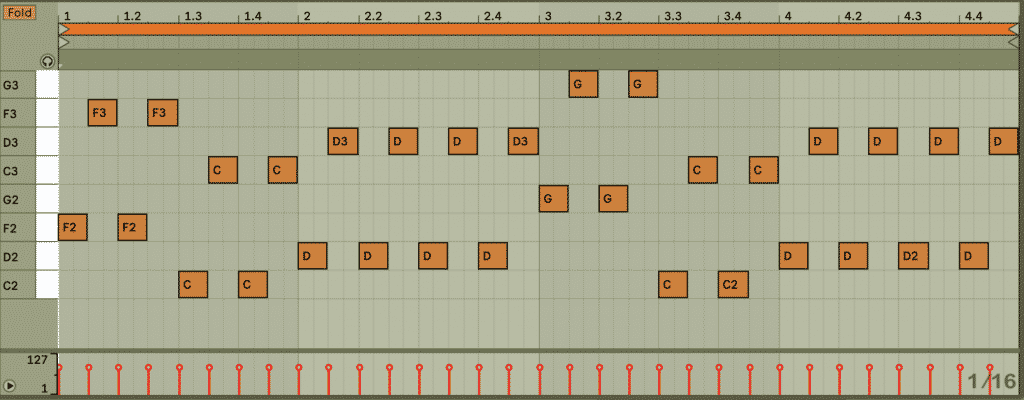
As you can see, the initial bass line is a variation on the simplified bass line that is used in the majority of the song. This is a classic bass line in new wave/synth pop music. The alternating between lower and higher octaves gives a strong rhythm when synchronized with the drums. See how they are emphasizing the beat in the image below?
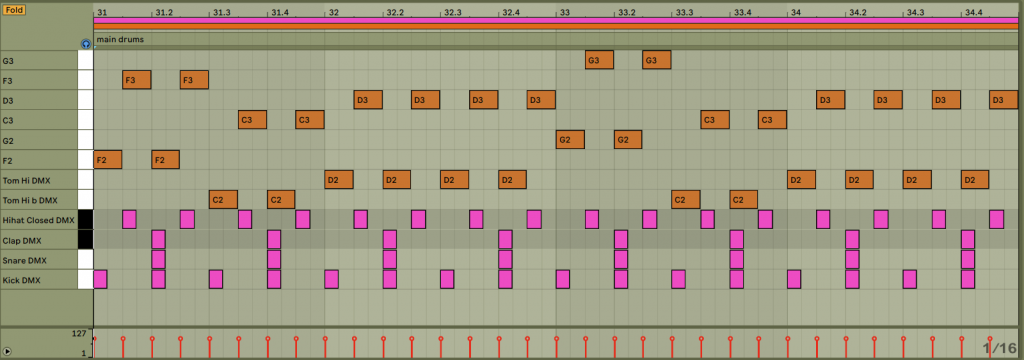
Finally, the bass line switches back to the intro strumming but doesn’t move up and octave on every other note. That way the groove stays intact but the tonal focus shifts to the funky clavinet and the vocals.
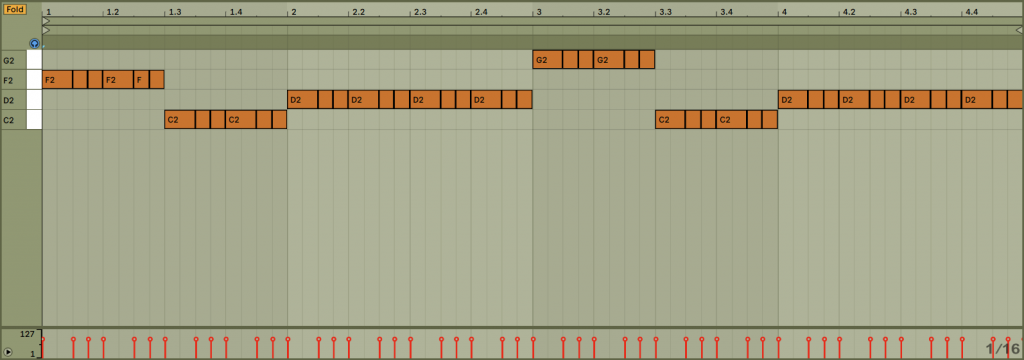
Those are the essential bass lines you’ll need to construct the bass part of the song. Continue below as we go over the accompanying melodic parts that give the song its unique flair.
Clavinettes
New Order utilized at least two different clavinet tracks for the song (maybe more). The first one you hear is during the intro as it fades in slowly to then match the bass line with passing notes to help it stand out a bit.
In Ableton, grab the “A Clavinette Session” instrument. We layered it in two octaves because it adds to the richness of the sound. Toss in a little delay and a phaser and see how close you can get to the original.
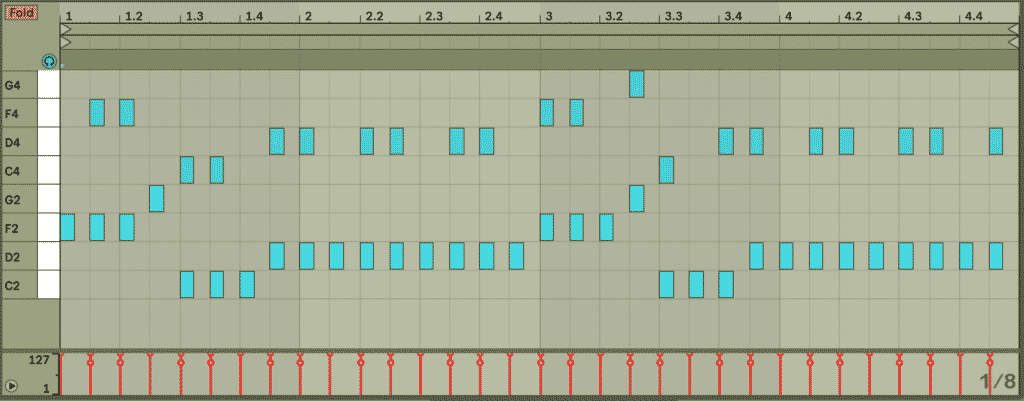
Later in the song another clavinet is introduced, this one is real funky. In Ableton you can use the preset Clav2 Thin. Play it on the upbeat to give the song that extra bounce. The progression is F-C-D-D-G-C-D-D.
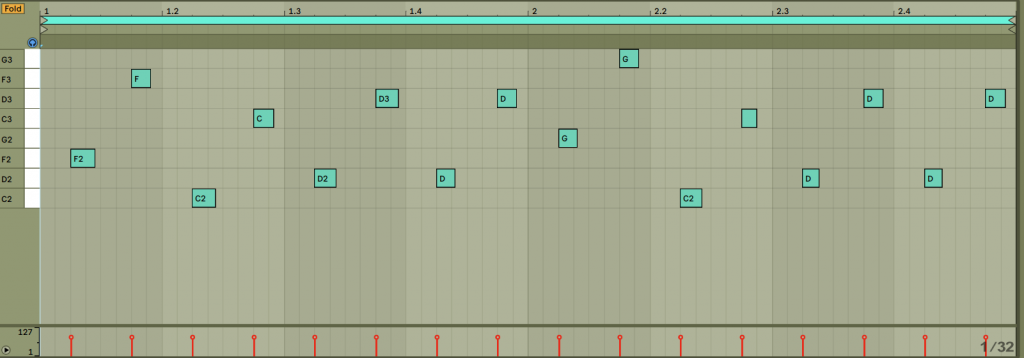
The intro clavinet plays for about 24 bars, is dropped, and then again during the outro. The funky clav begins shortly after the lead vocals come in and runs for about 60 bars.
The next element with some lure is the male vocal sample.
Male Vocal Drone
One of the most recognizable aspects of this song is the droning male vocal after the second big drum break. This is a sample from Kraftwerk’s song Uranium. The sample is heard eight seconds into the song. You can sample it yourself or you can download it from us at the end of this tutorial.
The sample is off-key a bit so once you’ve loaded it into your sampler, enter a MIDI note at C#3 and have it hold for 2 bars. Adjust the start and end of the sample accordingly.
Strings
These airy strings are easy as pie to make, and just as luscious. Grab the “Solina String Section” instrument in Ableton and let’s get started. The clip comes in around 51 bars, but with a passing note before. Look below to see what we mean.
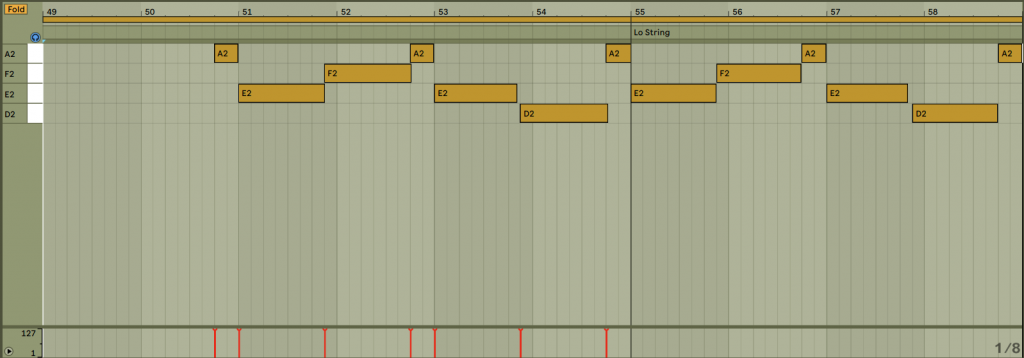
After that first A note the section loops for 24 bars. It follows E-F-A-E-D-A. After 8 bars is when the high string section comes in. This follows a descending pattern with chords and passing notes.
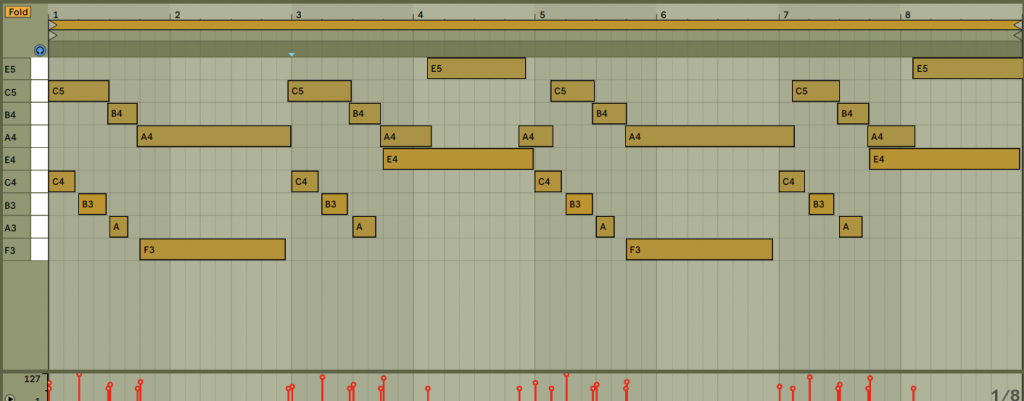
The notes and chords repeat twice in the clip above, and run for those 8 bars, then later in the song for 24 bars. Read below to learn the Brass section progressions.
Brass
The distinctive stabs throughout the song are the brass sections, typically heard at the end of a guitar or vocal phrase. There is a higher-pitched brass progression that repeats a few times, along with a lower-pitched section. That comes across almost as a growl of a horn sound.
Follow along to build the instrument from scratch. First thing is to grab yourself an Analog synth instrument. Activate both Oscillators, and set then both to Saw waves (a classic horn emulation). Place both on 50/50 which means both filters will affect both waves.

Then, adjust the frequency cutoff of Filter 1 (filter 2 is not used) and its resonance. Move over to the LFO section and activate both, then set both to a rate of 7.7 Hertz. Detune the entire instrument a bit, we chose 3.12.
Guitar
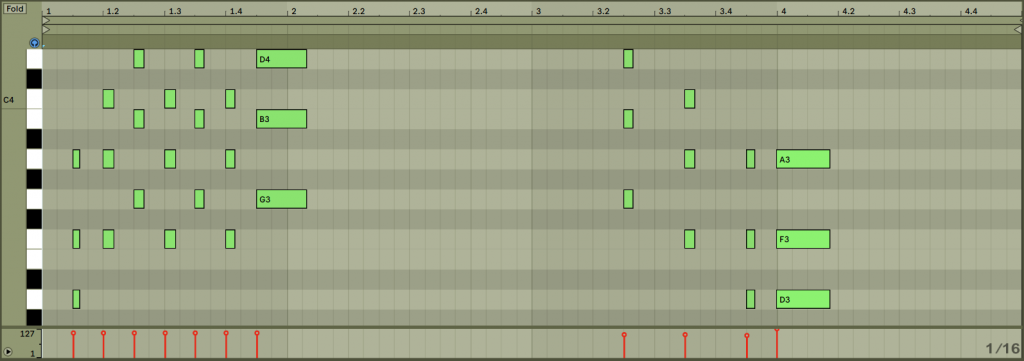
The guitar part in this song is another driving factor. It acts as a counter melody throughout the song, often mirroring the other leading progressions. The first part enters 43 bars in, it is below. To see the rest download the project file we’ve included at the bottom!

Lead Vocals
The lead vocals in this track were sung by Barnard Summer, we were unable to find an acapella so we gave you the next thing – the MIDI notes. Download the project to access those.
Download the Project
[ulp id=’XIj1PeIJMqC2MA1J’]
[su_divider top=”yes”]
Recommended Modules
[su_row]
[su_column size=”1/3″] [/su_column]
[su_column size=”1/3″] [/su_column]
[su_column size=”1/3″] [/su_column]
[/su_row]






0 responses on "Beat Lab Deconstruction - New Order's Blue Monday"