


How To String a Guitar From Start To Finish
As COVID closures and lockdown come to a slow end, we’re seeing plenty of optimistic returns to public spaces. People are going to the beach, protesting in solidarity with BLM and seeing a lot more of each other.
At the end of the day, we all need a little relief. What better way than to pick up your guitar, and sing a tune with friends? In this article, we’ll show you how to give your axe some attention and replace the strings. We may be compensated for purchases made using the links to products below.
[su_divider top=”no”]
Materials You’ll Need
You’ll need a few things before re-stringing your guitar, first and foremost: a guitar! We’re assuming you already have one but if you don’t we’ll give you a few good options below. After that, you’ll need to settle on strings.
Various options have their pros and cons that affect playability, durability, and cost. Finally, there are a few other accessories you may want to have that will make the job easier. Read below to assemble your gear!
[su_divider top=”no”]
Pick Up a Guitar
We won’t spend too much time on how to choose the right guitar for you in this article. Obviously, though, to re-string a guitar you will need a guitar. So go find yourself a steel-string acoustic guitar, classical guitar, or electric guitar.
We’ll assume for this article that you’re using a regular non-bass guitar. Though the process is the same for bass guitars, you just use fewer strings (usually).
The main difference between steel-string acoustic and classical guitars is in their tone and build. Classical guitars tend to have wider necks and full bodies while acoustic steel-string guitars have cutouts so you can access the higher frets.
As the name suggests, steel-string guitars utilize steel strings as opposed to the nylon strings in classical guitars. Electric guitars can come in a variety of shapes and sizes, but all use metal strings.
[su_divider top=”no”]
Strings
In order to re-string a guitar, you’ll need to have strings! Duh! If this is one of your first times completing the task you may be overwhelmed by options. We’re here to help you sort it out.
Guitar strings will fall into a few categories, and be based on the type of guitar: acoustic or electric? Acoustic guitar strings will be designed for classical-guitar or steel-string acoustic guitars. Both allow for different types of playing styles because of the string material and how they respond to touch.
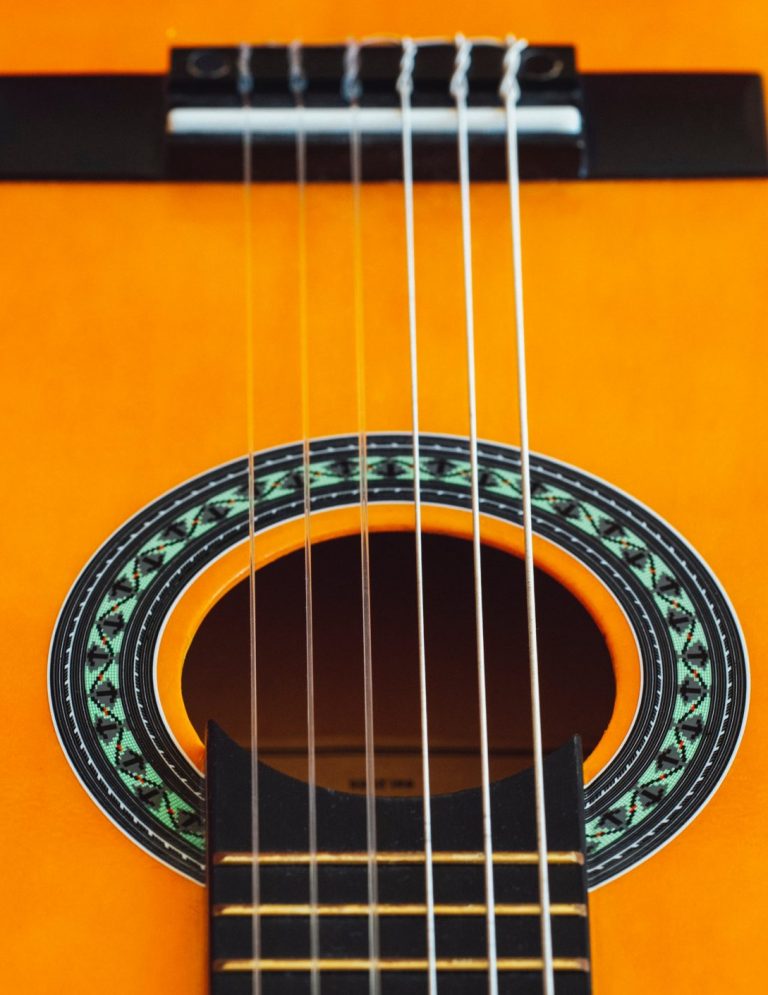
As we mentioned earlier, classical guitars utilize nylon strings, that’s a major part of what sets them apart. They also use metal wrapped around nylon for the top three strings. In the picture above you can see what we mean.
Classical nylon strings are more mellow than steel strings. They’ll sound gentler and less twangy. They’re a bit thicker and thus easier on the fingers, so a good choice for beginners.
Steel strings are thinner and may ‘cut’ into the fingers – not to the point of slicing your fingers – and they may leave an indentation. With enough practice, you won’t notice.
Below are a few options for acoustic guitar strings.
Next up is the electric guitar strings. Which kind will you want? The material and stiffness will determine how your fingers feel after shredding.
The main options are stainless steel, nickel, or nick-plated strings. Nickel strings were originally used in the 50’s so they have an associated vintage sound. Alternatively, steel strings are stronger and will sound punchier.
Your final consideration will be the string gauge or thickness. Higher gauge strings will be louder and sustain longer – this makes them great for rhythm guitar playing. If your focus will be more on lead guitar, then you’ll want lower gauge strings. They will be easier to play as they bend easier, and your fingers won’t get nearly as tired.
Check out the options above and explore! Guitar strings are an understated part of the guitar playing experience. Buy a few sets and try them all out!
[su_divider top=”yes”]
Accessories
There are a few accessories that will make your life easier during this process. They are small purchases that should last you many years and worth the investment. First, is the guitar tuner. You can use this while stringing the guitar in addition to any future playing you do.
There are handheld tuners, digital tuners, neck-clamps tuners, pedal tuners, etc. The list goes on and on. We’ve included just a few options below, feel free to explore on your own to see which works best for you.
Next up is the peg winder. This will save you so much hassle, don’t overlook this purchase. It’s essentially a wrench, but you lock it around the tuning pegs and can crank it. Look at the options below.
You can opt for the winder by itself, or use or favorite – the multitool. It comes with a wire cutter attached so you can clip away the extra string. The one listed above isn’t necessarily our favorite brand, just the style.
Finally! Read the tutorial below.
[su_divider top=”yes”]
Time to String the Guitar
Now that you’ve got all your materials, you’re ready to do the deed. Grab your guitar, strings, and any accessories you may have and follow the instructions below.
Acoustic guitar strings will typically be secured to the action of the guitar by tying them into knots. If you’re stringing up an acoustic guitar go ahead and route them through the action, then lace them three or four times around so they don’t come out. Then you’ll bring the other ends of the strings up to the guitar head for tightening.
If you are re-stringing a guitar, make sure to loosen each of the strings a bit first, then clip them in the middle. If you don’t have clippers then loosen each of the strings a bit at a time, working your way to all of the strings loosening gat the same rate. This way the tension in the guitar neck is released slowly and evenly.
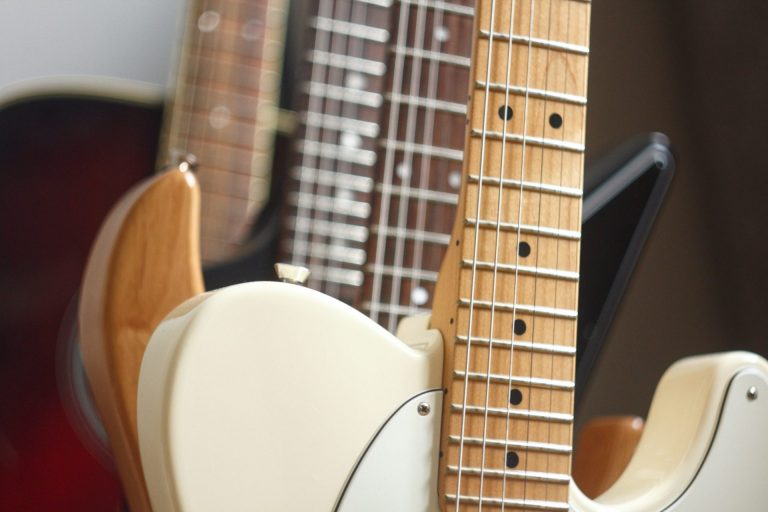
Electric guitars typically secure strings by routing them through holes in the action and are held in place with nuts. See the images below.
[su_custom_gallery source=”media: 44636,44634,44633,44632,44627″ limit=”4″ link=”custom” width=”360″ height=”150″ title=”never”]
Please excuse the dust, I haven’t picked up that guitar in ages. Anyway, as you could see, the strings are routed through the body, then over the action, then up to the guitar head where they are twisted into place.
Guitars can have one of many head styles, but they all use the same insert and twist method of tightened the strings. You run the string through the hole/slot in the tuning peg, then wind the peg tight in a counter-clockwise direction. Make sure the strings don’t overlap on the peg, you want them to rest evenly.
Make sure you use the correct strings for each tuning peg. The thickest string is the lowest in pitch and meant to go in the peg nearest to you when holding the guitar in a playing position. Place the strings in decreasing thickness from there.
Tighten the string until it’s taut, but not too tight, and have your tuner ready. As the string goes taut you’ll need to tune it to the correct frequency.
Once you’ve locked in all of the strings to the proper pitch, pull the strings away from the bridge of the guitar a couple of times. Retune the guitar immediately. This will stretch them into place, and help them settle and hold their tuning longer.
Play the guitar a bit and retune as needed! The guitar should settle into place soon enough.
[su_divider top=”yes”]
Learn About Music Theory and More in Beat Lab’s Online Course!
Just like the process explained in today’s article, Beat Lab Online will have you making music in no time. Further your production while maintaining social distancing with Beat Lab’s Online Certification program! Take advantage of this limited-time sale price of 50% off!

[su_divider top=”yes”]
Recommended Modules
[su_row]
[su_column size=”1/3″] [/su_column]
[su_column size=”1/3″] [/su_column]
[su_column size=”1/3″] [/su_column]
[/su_row]
[su_button url=”https://beatlabacademy.com/modules” style=”ghost” background=”#303133″ color=”#303133″ size=”12″ wide=”yes” center=”yes” radius=”20″ icon_color=”#303133″ class=”custombuttonsyeuda”]Beat Lab Modules[/su_button]
[su_button url=”https://beatlabacademy.com/blog/” style=”ghost” background=”#303133″ color=”#303133″ size=”12″ wide=”yes” center=”yes” radius=”20″ icon_color=”#303133″ class=”custombuttonsyeuda”]Back to Blog[/su_button]
Featured Masterclass


0 responses on "How To String a Guitar From Start To Finish"