

iZotope Neutron 3 – Mixing in the 31st Century
We’ve covered various products from iZotope over the years and are excited to cover their updated version of the insanely powerful plugin Neutron 3. This marks the third iteration of the plugin, which we wrote about the first version back in 2017. The most significant changes to the plugin come with the Module Interface, the Masking Meter, the Assistant Feature, and the brand new module called Sculptor. iZotope also made changes to the technology under the hood to improve performance and processing, these changes are tangible as you can now throw more instances of Neutron 3 in your project than before.
In this article, we’ll take you through the new features found in Neutron 3 and show you how to get the most out of the plugin.
[su_divider top=”no” divider_color=”#d2d2d2″ size=”1″]
General User Interface
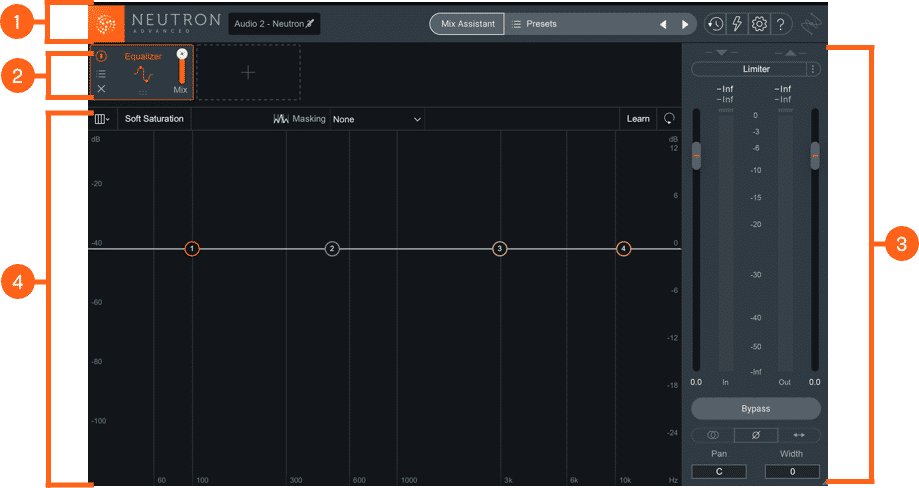
First thing’s first – the GUI (general user interface). There are four main sections – the Global Header, Signal Chain, I/O Panel, and the Module Interface (refer to the chart below). The Global Header is where you can title each plugin for a given track, access the presets/assistant features, and options. Below that is the Signal Chain where you can add or remove effects modules, and change their order. On the far right is the I/O panel where you can adjust level and stereo controls. The largest part of the plugin is occupied by the Module Interface where you can adjust individual parameters of each effects module. This section looks and operates in a different way than the prior iteration Neutron 2.
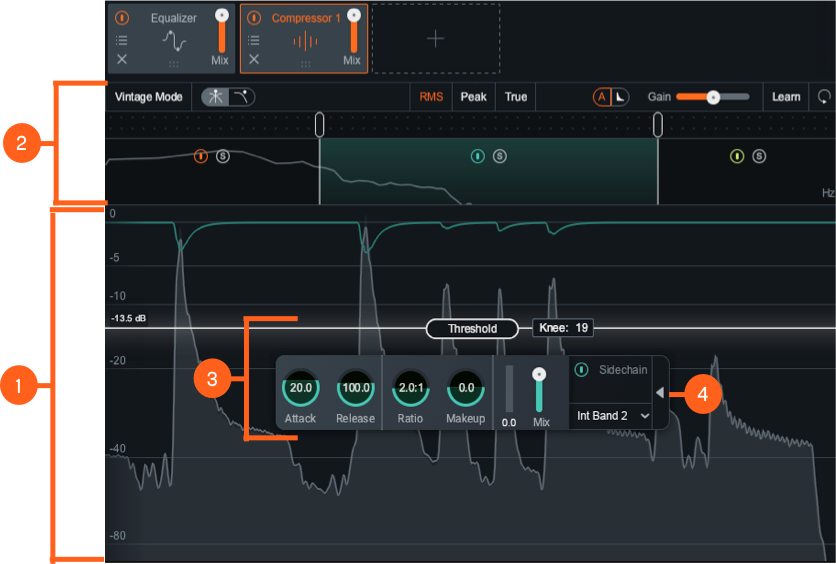
The Module Interface here works more like Nectar 3 than the prior versions of Neutron. Each module’s parameters can be accessed and adjusted in a floating box and a series of dropdown menus (see image 1 below). This method looks a lot cleaner and dedicates more screen space to the frequency spectrum. In the prior versions, you could access controls underneath the spectrum. Additionally, now you can make each module multiband (see image 2 below) rather than that being the default setting.
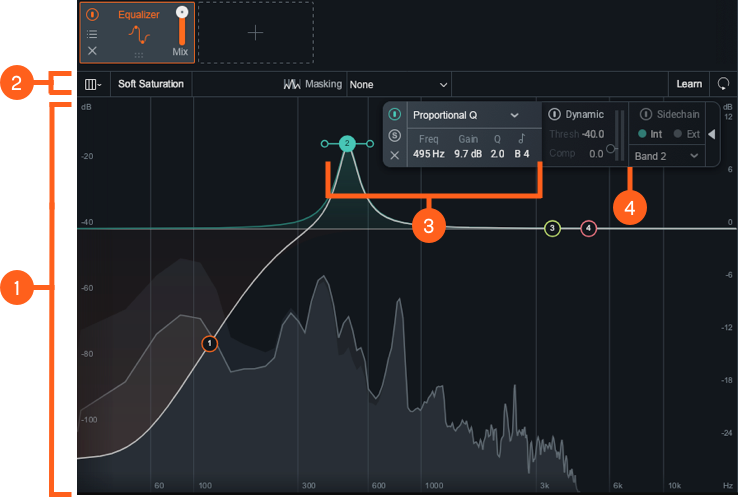
In Neutron 2, there were controls visible that may not always have been needed. This was sometimes overwhelming to users because it felt like Neutron was a more complex tool than necessary for most mixing projects. Now, in each of Neutron 3’s multiband modules, you start with a broad frequency spectrum with a simple set of controls. If you want to get more surgical, you can easily add additional frequency bands by clicking right on the spectrum at the top of the UI. This allows you to work more naturally, while at the same time reducing on-screen clutter in the more complex modules.
Masking Meter
In the new Module Interface, you can find an updated Masking Meter. This masking meter has a fresh look and upgraded algorithm. Now you can adjust the sensitivity to the input signal which will listen to incoming loudness. Two similar frequencies from different tracks will boost that loudness and trigger the masking meter. iZotope said it’s up to users to use their judgment about whether that loudness is good or bad in each instance.
In Neutron 3, we improved the Masking Meter design from the previous two versions by directly overlaying the audio information from both selected EQs on top of one another, making it even easier to see where frequency collisions are occurring. The new Masking Meter lets you see the relationship of two plug-ins more easily, by showing both the spectrum and EQ curves on the same scale.
The Masking Meter is another fantastic tool at your disposal thanks to the ingenious engineers at iZotope. We love the updated look and functionality of it. When used in combination with the Mix Assistant, this plugin will help you become unstoppable.
[su_divider top=”no” divider_color=”#d2d2d2″ size=”1″]
Mix Assistant
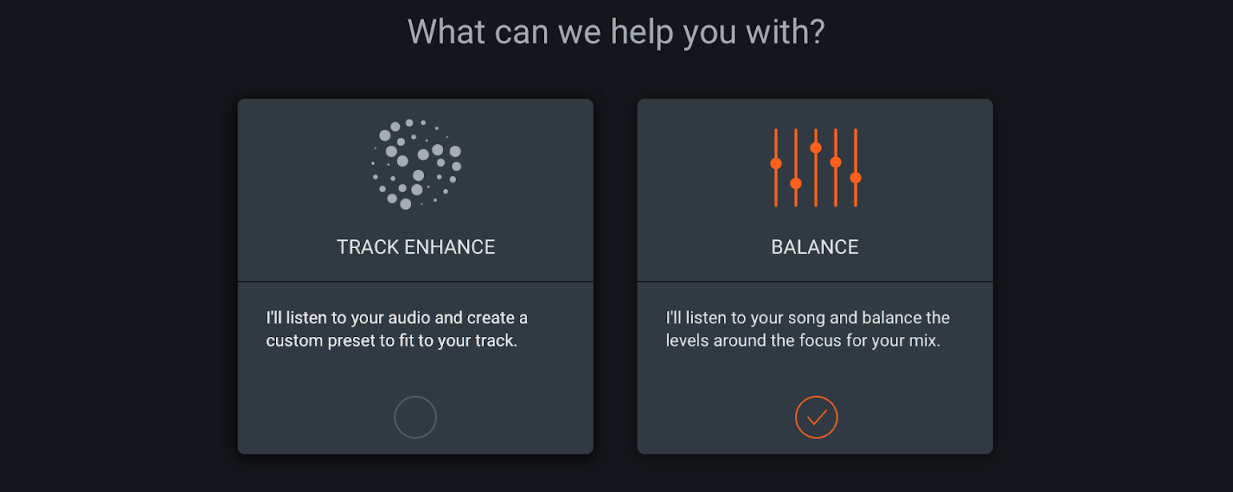
The Mix Assistant has a new feature not previously found in Neutron, the Track Assistant (Track Enhance). This is a micro approach to individual track mixing versus Balance which is a macro approach to your whole mix. In Neutron 2 you could use the Mix Assistant on tracks or busses and experience good results, but iZotope has improved their A.I. technology for an even more focused approach. The results are astonishing and push us even closer to the 31st century.
Mix assistant will analyze your entire song then group elements according to what it considers similar elements. Essentially it will group elements then adjust relative levels of those groups. This is an alternative method to your own group bussing. If you already group your tracks into similar busses then you can place Neutron 3 or Relay instances on them and still analyze, then let Neutron 3 adjust the group levels.
In delightful fashion, iZotope has made a video to show you the ropes. View it below!
[su_youtube_advanced url=”https://youtu.be/gUD2G9nCc0k” width=”400″ height=”200″ rel=”no” modestbranding=”yes” https=”yes”]
[su_divider top=”no” divider_color=”#d2d2d2″ size=”1″]
Sculptor
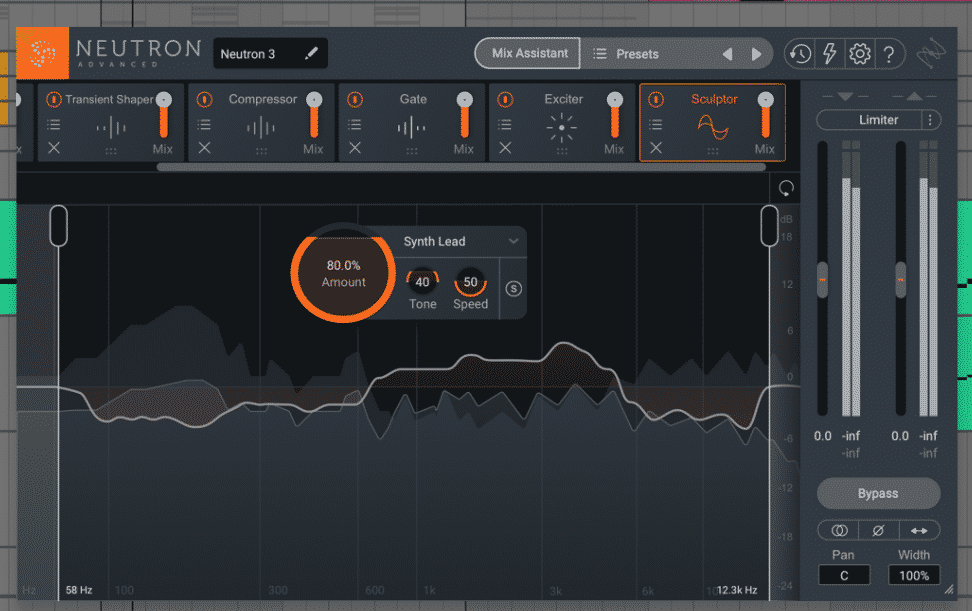
Sculptor is a new module that has been added to the Effects lineup just for Neutron 3. It’s a one-shop-stop built on iZotope’s spectral shaping tehcnology; with a few simple parameters, it can add Polish, Punch or Fullness to your track. How does it sound? It sounds good. We threw it on some vocals that just sounded muddy no matter what we did and Sculptor was able to bring it to life. Learn how to use it more in depth via the video below!
[su_youtube_advanced url=”https://youtu.be/vMHWquSbREs” width=”400″ height=”200″ rel=”no” modestbranding=”yes” https=”yes”]
[su_divider top=”no” divider_color=”#d2d2d2″ size=”1″]
The Gauge
iZotope introduced a new function of control called the Gauge. The Gauge is a redesign in the UX side of Neutron, you may not have even noticed it until reading this article. Instead of a slider, or a knob, we now have a combination of the two. Why? It became clear when using the Gauge that the old ways were an unnatural method.
The action of clicking and dragging up or down doesn’t always line up to the real-world interaction of using them. You should be able to work directly with what you see and translate what you hear with easy-to-use controls nested in smooth, understandable metering.
It’s innovative moves like this and the rest of Neutron 3 that make iZotope one of our favorite companies in the business. They are constantly shifting the perspective on what music production can look and feel like, and the tools used in the process.
Neutron 3 is the powerhouse we didn’t see coming because we thought it couldn’t get any better. That’s just the kind of company iZotope is – the group that keeps on giving. We definitely recommend purchasing the plugin, and if you buy now you can score it at an introductory sale price of $199 Standard or $299 Advanced.
[divider style=”clear”]
WANT TO TAKE YOUR PRODUCTION TO THE NEXT LEVEL?
Featured Masterclass


0 responses on "iZotope Neutron 3 - Mixing in the 31st Century"